Saturday, April 6, 2013

Lemon Spice Squares


You may or may not know, I live in Redlands, California. In its hay day Redlands was the citrus capital of the world (OK slight exaggeration; there were a lot of citrus groves).  There are still a few around town and they are the predominant tree type in residents gardens.  At this time of year every where you look you see trees laden with juicy citrus fruits and/or delicate blossom.  The intoxicating fragrance of the orange blossom wafts around you the moment you step outside it really is gorgeous (or sneeze worthy depending on your allergy status!). Now is the time to get busy with citrus fruits.

A friend gave us a huge bowl of lemon's from her tree; we made lemonade and lemon surprise pudding then I remembered lemon spice squares.  Lemon spice squares are part of my childhood; just saying the name stimulated my senses and I haven't eaten one for at least 15 years.

I didn't have a copy of the recipe. I tried googling it, nothing. My sister couldn't find her copy and my Mum wasn't home so no help. I then tweeted my oldest friend & she came up trumps. Yay for Harriet! Her eldest daughter had put the recipe in her school fundraiser cookbook. One twit pic later & we were cooking. Don't you just love social media?! 
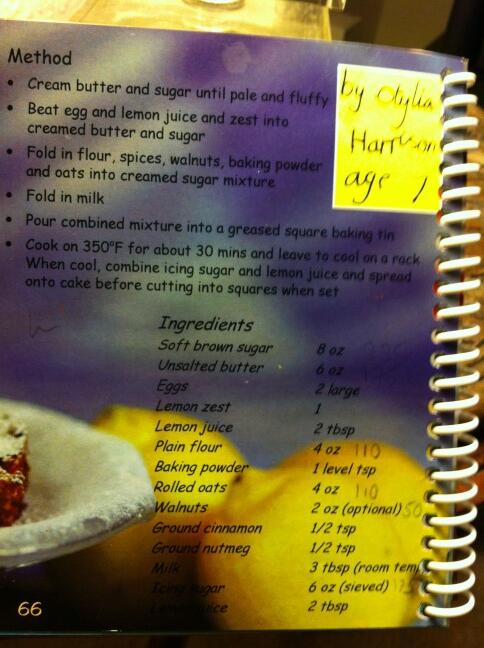


My mum thinks the recipe came from her cousin Ann who lives in Vancouver, and judging by the butter quantities it did come from another era.  Lemon spice squares are moist, light, chewy from the oats and deliciously citrusy.  I think we should patent* the recipe as I couldn't find it on the web; remember you read it here first!

Lemon Spice Squares
Here it is again in case you can't read the picture

8oz of soft brown sugar
6oz unsalted sugar
2 large eggs
zest & juice of one large lemon, or 2 for a mega citrus hit
4oz plain flour
1 tsp baking powder
4oz jumbo oats
pinch of salt
1 tsp (at least) cinammon
1 tsp (at least) nutmeg
3 tbs milk

6oz sifted icing sugar
2 tbs of lemon juice

Preheat the oven to 350F.
Cream the butter & sugar together until pale & fluffy. Much easier if you use an electric mixer.  Beat in the eggs, lemon juice & zest to the butter mix. It does look a bit curdled, don't worry. Now fold in the dry ingredients - flour, baking powder & oats.  Lastly stir in the milk.  


Spread into your lined tin (mine is approx 7x11") and bake for 30-35mins.  Do the clean skewer test, it should be slightly browned on top.  


Whilst it is baking mix up the glaze of icing sugar and lemon juice. Pour over the cake whilst it is still warm in the tin.  Cut into squares and devour.


Next time I make them I may have a fiddle with the quantities to lighten the butter load, use a mix of wholewheat & plain flour, more oats etc but for now we were happy to enjoy them just as I had remembered.

Do you have a recipe from your childhood? Do you still use it? 


Monday, February 11, 2013

Quick Valentine cards

Not long until the big V day.  These cards are so quick and easy to do and use supplies you normally have at home already.  It is great craft activity to do with the kids; given they usually have 30 odd to do these leave them plenty of time to get writing the names!


I bought a pack of cards & envelopes from Joann's but you could do postcard style and cut the card yourself (reducing cost).  We had poster paint so I used that and watered it down a little which makes a better flicking/spraying action. The heart was cut free hand from another piece of card. I ended up using a couple as they got harder to get off the more painty they got.


Using a little spray adhesive stick on the heart and flick away!


We found just bending the card levered up the heart enough to peel it off put it onto the next one.


Now onto writing those names....

Happy Valentine's Day x

Sunday, February 10, 2013

Over sized ruler height chart


DIY over sized ruler height chart
I made our existing height chart on a whim with the girls as an afternoon's activity a few years ago.  Whilst it is bright and colourful and made by them its not going to stand the test of time.  .  
My girls love their height/growth chart.  They are bounding with enthusiasm and excitement when Daddy gets out the special book as they stand like soliders with backs against the wall and can be crestfallen if they haven't grown since he last measured them.

When I think about height charts I think about pen marks up a wall.  I love the permanency of that, seeing your little people grow up before your eyes.  So at the back of my mind I had a thought that I wanted to upgrade our existing chart to something that would stand the test of time.
When I first started really looking at blogs I came across this beautiful embroidered growth chart at the Student Teacher. Sadly her blog is no longer accessible but she did have a great tutorial and I strongly considered make this one.

051911-growth2.jpg
Image: The Student Teacher

A friend of mine whose blog is also out of action made this great height chart from old rulers, which I think may have sparked my imagination.


Image: A Year Above the Shop

One day (or was it night?) whilst looking at Pinterest wasting my life away looking for ideas I came across this growth chart from Dear Lillie. Bingo! Obviously I wasn't going to pay $70 when I could enjoy making one myself.  However it is a lovely chart so if you don't fancy making one pop on over to them.


Source: Dear Lillie oversized ruler growth chart
The first port of call was Home Depot for a piece of wood.  Mr Maker is the wood man so he took pleasure (seriously) in picking me up a plank; it is cedar and was $25. You could get a cheaper piece to get the cost down but make sure you spend time getting a flat, level piece.

I tried out various stains I already had and then went with the darker milk paint.

However I didn't like the end result.  It came out blotchy, most likely application error rather than the paint itself.  So I sanded it off and applied a coat of Feed-N-Wax.  The end result was rather pleasing; a warm wood colour with the grain highlighted. Sometimes the best results are the product of a mistake.


The stencils were from Lowes (click for link) which turned out much cheaper than any from Michael's.  I decided on the format and penciled on the numbers and lines.  As per instructions on the stencil box I attached them with tape and began dabbing/blotting on the paint.  An old not-washed-out-properly stiffened paint brush was the perfect applicator.

Bam! School boy stencil error!  Rather serious paint bleed from the edge of the stencils.  Take two:  I used a spray adhesive to hold them in place which gave lovely crisp lines.


Job done.  Two weeks later its finally up on the wall, now I just need to copy over our old measurements.  


Old & new
Reluctant dressed up model
Break down of costs

  • Wood - $25
  • Stencils (which are reusable) - $5.66
  • Paint - $4.95 I only used a miniscual amount so plenty left for future projects
  • Milk paint & wax - $0 
  • Wall hook - $2
Really the total cost was about $28.  This doesn't include my time - a few hours, but what a saving.  Got to love that.


Friday, January 25, 2013

Contemporary bathroom remodel

We started the demo on the bathroom back in November (yes NOVEMBER people) and finally completed all of the 'snags' last night.  It has been usable (bath & loo plumbed in) since mid December but those final snags have taken their time to get done.  Big pats on the back to me & Mr me!  And it looks pretty damn good, if I say so myself. We did the majority of the work ourselves; a lovely handyman moved the drain for the bath tub, did the plumbing for the new shower and framed out the bath and we got stuck in to all the other jobs.  It was a first for me on tiling but Mr has done electrics and plumbing before.


I know, pretty professional looking isn't it?!!  The fact we managed to do it on a budget was also a huge win. I spent a lot of time trawling the internet for the best deals for individual items (I found considerable variations in price between websites) and getting the sink vanity unit & cupboards from Ikea saved us a princely sum.  For those of you interested I shall give you a source list at the bottom of this post.


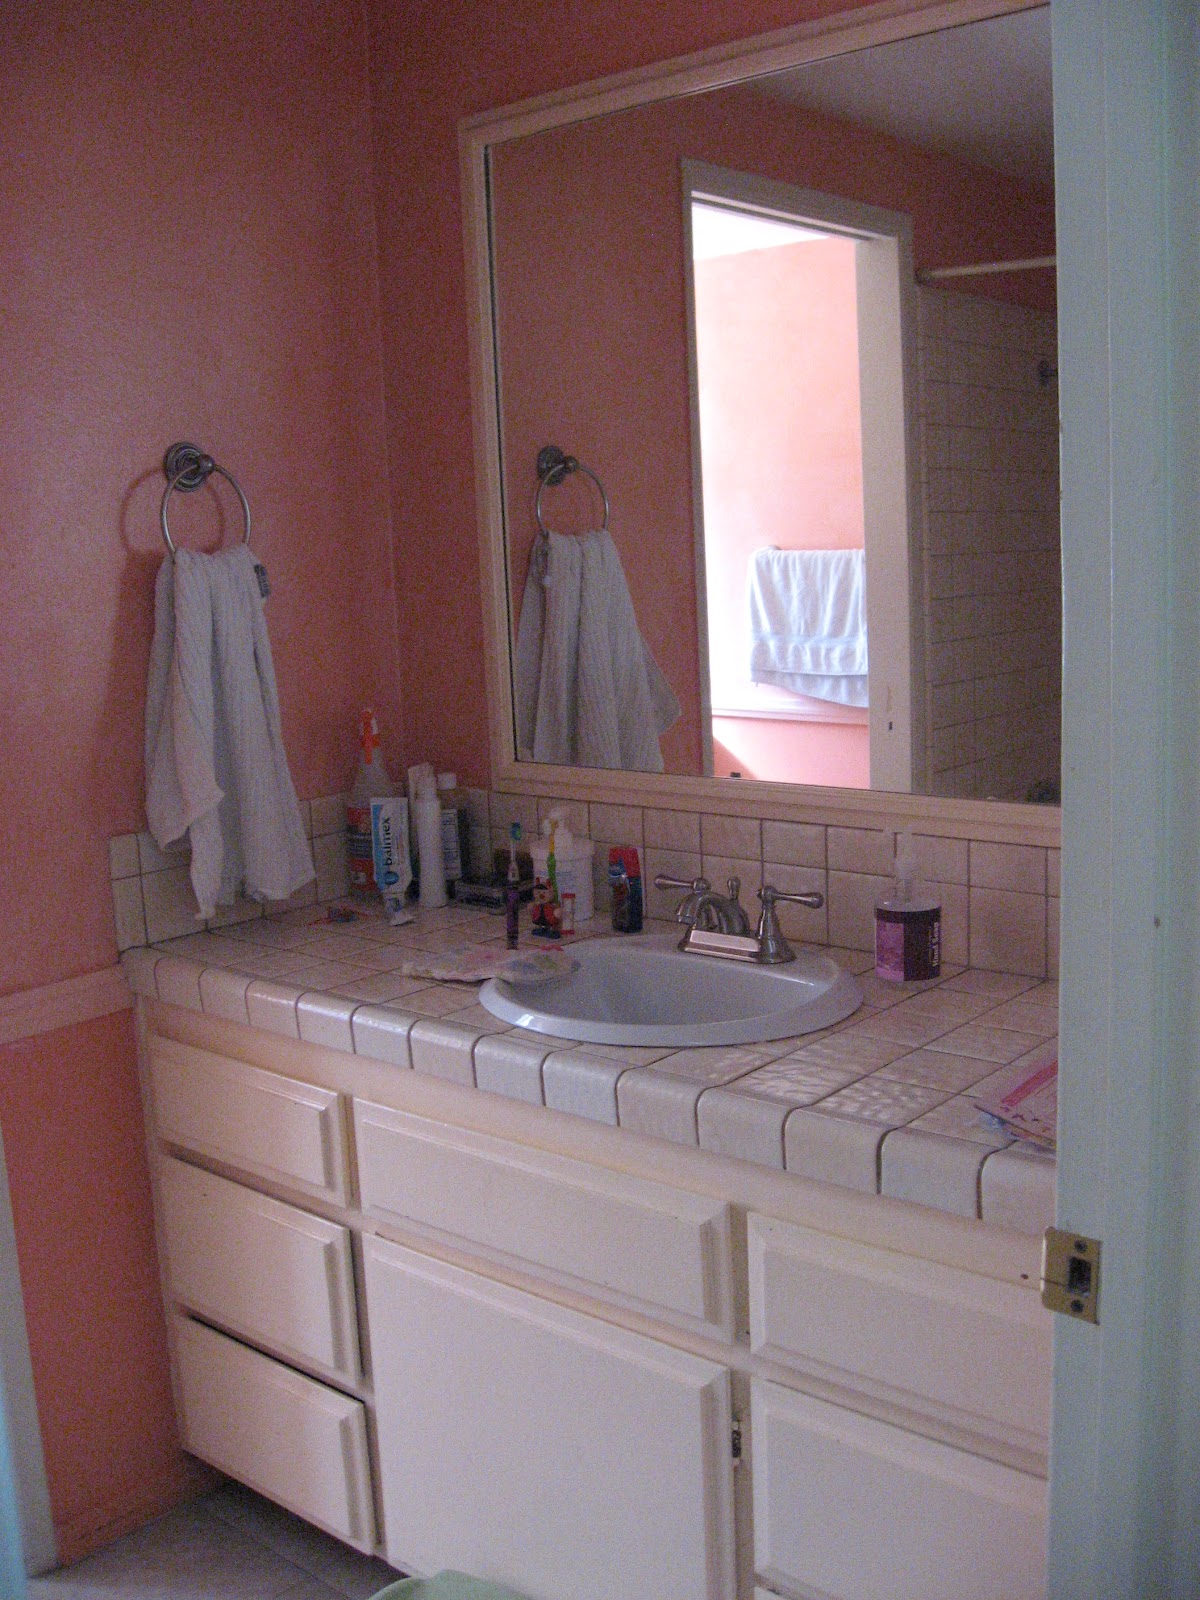
So a quick reminder of the vision in salmon that was the bathroom before....


Here is what we did....

First up is the fun part - demo which was a days work.

Sink & washing machine out

Before removing bathtub & loo

Floor taken up & new drain plumbed in
bath tub frame

The bath tub was dropped into the frame and set it in concrete. This was done by our handy handyman.

I decided to paint the walls next on the advice of our handyman. A nice easy job that could be done whilst Mr. put up hardiebacker around the bath & its frame and covered it with a waterproof membrane.  An extra precaution as hardiebacker is waterproof; gotta do that job properly, right?

Next was the considerable job of tiling, this took us a lot longer than we anticipated which threw off our original deadline. Mr. quickly threw up the 'muck' on the bath surround and gallantly set to tiling it with the mosaic tiles. Six trillion cuts and as many swear words later he finished that job. Glad it wasn't me.  Note to self: don't use mosaic porcelain tiles when you have to do multiple cuts.

I had chosen white subway tiles for the bath surround which do require a bit more work in terms of pre-installation preparation. As I mentioned this was my first foray into tiling so here are a few of my top tips that are worth noting.

Subway tiling top tips
  1. Have the right tools for the job which include a paddle for your drill to mix up the thinset, notched trowel for spreading on & out the thinset, regular trowel, tile spacers, level, tape measure & pencil (or chalk line), tile saw, grout float, sponge & bucket.  Luckily we had friends who lent us most of the tools. Thanks Tim!
  2. Mix the thinset well.  Follow the instructions on the packet and mix for longer than you need to, or until its pancake batter smooth. I had a few lumps in my first batch and I worried that its strength was compromised. If you follow the instructions on the packet future batches should be the same consistency so will apply the same.
  3. Draw as many guidelines as you can be bothered. It does really help, even if you have put thinset over them it helps guide your eye.  Don't forget to include the gap made by the spacers when you draw out your lines.
  4. Start from the bottom and work up. Better to have odd cuts at the top rather than around the edge of the tub.
  5. Start by tiling a small area. I found doing one row at a time at the back of the tub plenty until I got my confidence up.
  6. Be consistent with the amount of thinset you apply. A tough one; too much and it oozes out between the tile (hard to get off & then makes grouting difficult) but not enough and the tile may come down (that was my worry!).  Scrap your trowel lines horizontally.
  7. Check your levels frequently & use a ruler/tape measure. I obsessively checked the tiles were level and evenly spaced to start with but once I got going I found I was very good at judging it with my eye. Find what works for you.
  8. Wipe excess thinset as you go, its much easier to get off when its wet.
  9. Allow plenty of time to get the job done. It goes without saying but its very annoying if you have to take the kids somewhere half way through your job.  The back of the bath took me an afternoon.
  10. Precut all your tiles before you start.  Makes it soo much quicker and easier. I wrote in pencil on the back of cut tiles where they went up. Putting a cut tile in the wrong place can mean having to cut another whilst your thinset is hardening on the wall.
This list is by no means exhaustive but its what pops into my head as important.  Tiling is not that difficult, once you get going its quite straight forward, boring in fact, so have the radio on!


Completed tiling minus grout
I found the grouting a lot more stressful than tiling.  After researching & chatting to the helpful Home Depot guys we chose sanded grout for the wall tiles.  Lets just say it was obvious why its 'sanded' grout; our bright white grout had a distinct pinky sand coloured hue to it and an distinct grittiness showing through...It has dried whiter and you don't really see the texture unless you peer very closely, but still I will be using non sanded grout next time!

Tiling the floor was a breeze with the 12"x24" tiles.  We spent time laying them out, centering them from the hall door & around the tub, then did all the cuts before we laid them.  Those puppies went down a dream.  We used grey grout to match the tile. Wipe off the excess grout as you go, it is a million times easier to get off when wet. I didn't on the bath surround and its still there now in places...

Floor tiles minus grout
The Ikea cabinets in the laundry area were super easy to assemble and secure in place; the washer/dryer stack took some acrobatics from Mr. to get fitted in, fortunately he was able to climb up & out.

So there you have it, job done. I am now gathering materials and strength to start on our en-suite. 


Breakdown sources

  • White subway tiles - Home Depot
  • Grey 12" x 24" floor tiles - Lowes 
  • Grey mosaic tiles on side of bathtub - Lowes. All the tiles from Lowes were 'free' as we had a store credit from a deal we got when we bought our replacement windows. Sweet.
  • Wall Paint - Benjamin Moore Palladian Blue
  • Sink & vanity - Ikea
  • Sink tap/faucet - Moen from efaucets
  • Tall cupboard & laundry basket cupboard - Ikea kitchen units
  • Granite counter top - off cut from Stone Solutions
  • Toilet - Kohler Wellworth from Home Depot
  • Bath tub - Kohler from Home Depot (I'm sure I paid less than now listed on their site)
  • Shower head & tub kit - Moen from efaucets
  • Shower screen - Dreamline from Mainfaucets
  • Bath mat - Target
  • Towels - Kissing Rabbits by Anorak, bought by my Mum from the UK
  • Towel hooks - Every which way hook from The Land of Nod mounted on a piece of walnut we already had
  • Towel rail & toilet roll holder - Gatco Latitude II range from efaucets
  • Stools - Had years ago, they are Kartell Ghost stools, can get from Wayfair
  • Step - Ikea, spray painted orange
  • Vanity light - Nuvo lighting from Wayfair (again I got at a cheaper price, not sure why!)
  • Recessed ceiling lights - 
  • Vanity cupboard (on wall by door) - Amazon
  • Mirror about sink - was Ikea years ago stained to match walnut 
  • Washer & Dryer - already owned, seconds (they have a few scratches) from Samsung Clearance Warehouse
  • Nellies laundry soap tins - Crate & Barrel
  • Miscellaneous materials/supplies - all Home Depot (I had a 5 times a week habit at the height of the remodel)
I used Pinterest loads while I researched products and ideas on how I wanted it to look. For example, it was very useful to show our handyman a picture of how we wanted the framed bathtub to look.

We ended up spending about $5500 (for those of you interested in numbers) which we were pretty pleased with. If we had hired out I am sure we could have spent triple that number.  A big cost was moving the bathtub/shower drain as the concrete slab had to be drilled out.  It was worth every penny as it really opened up the room by switching the shower to the other end of the tub.  It took about 8 weeks to do the majority of the work & several more weeks to finish off all the snags. (I haven't even mentioned the first shower screen exploding on Mr.!!!) An an advantage of it taking so long is the costs were spread over the months.  The shower screen was the first thing I bought back in October. 

A nod of thanks needs to go to our friends who lent us tools and the endless use of their washing machine(s) as ours was out of action for months :-)

Wow - that was a long post, thanks for reading! 

Have you renovated your bathroom recently? Tried tiling for the first time? Jump on in! The thought is more scary, honest!


Saturday, January 12, 2013

Storage basket

Belated Happy New Year! After a fun filled Christmas and New Year in the UK I am back home and full of early January enthusiasm for all things blog, so here we are first post of 2013.

We finished the main bathroom renovation before our trip, just. We were literally doing jobs the night before our flight.  Needless to say there are still a few snags to be completed but I took this week to reacquaint myself with my sewing machine instead.  My parents live near a fantastic independent fabric shop, Ray-Stitch, and of course I could not help but make a purchase or two.

Lotta Jansdotter - Bella - Rocky Shore in Poppy
Lotta Jansdotter - Bella
I wanted to make a storage basket to hold spare loo rolls and fill an awkward gap between the dryer and the ceiling.  This pattern from JCaroline Creative was closest to the size I wanted from those pinned on Pinterest. It was an easy pattern to follow; although I needed more than 1/2 yard of the lining fabric & I used a different type of stabilizer (which wasn't quite as sturdy as hers).  Click on the link to follow her instructions if you fancy making your own.


Feel free to admire the beautiful tiling.......I will post the final bathroom reveal soon, I promise.

Thursday, November 1, 2012

Pumpkin Oatmeal and raisin cookies

I came across a pin on Pinterest which detailed numerous acts of kindness a Mum & her kids did. It got me thinking. My girls are pretty good most of the time and do show empathy towards others close to them however they have little grasp of the wider world (kinda understandable, they are kids).
I thought random acts of kindness would be a fun thing to do with them.

In keeping with the seasonal pumpkin theme, we made these delicious  pumpkin oatmeal & raisin cookies. Esme then decorated lunch bags to deliver them in.  The girls discussed who we should give them to, their ideas not mine.  The recipients were several elderly neighbours, the lollipop lady, the helpers at the YMCA kids club & the builder who is currently banging away in our bathroom.  The girls were super excited to hand them out and the cookies were really well received. It made all of us feel nice inside :-). We are now thinking we will do the same at Christmas and maybe even Thanksgiving!


Pumpkin oatmeal & raisin cookies

2 cups plain flour
1 1/2 cups of old fashioned oats
1 tsp baking soda
2 tsp cinnamon
2 tsp ginger
grate of nutmeg
pinch of salt
1 cup of unsalted butter (2 sticks)
1 cup brown sugar (light or dark, I used dark)
1 cup white sugar
1 cup pumpkin puree
1 egg
tsp vanilla extract
1 cup of raisins
Handful of white chocolate chips (not necessary, but nice!)

This quantity makes LOADS! I forgot to count them but it was 3 tray fulls.

Oven at 350F.  Line baking sheets.  Combine the dry ingredients - flour, oats, baking soda, spices, salt in a bowl.  In a separate bowl use an electric mixer to beat butter & sugars until they go pale and fluffy. Then add the pumpkin, egg & vanilla extract to the butter mixture.  Beat to combine. Add the flour mixture, a little at a time until it is all combined.  Stir in the raisins and chocolate chips if you are using. 
Use a desert spoon to drop mixture onto baking sheets. They don't spread out that much so you can squish them on.
Bake for about 15mins (check after 12) or until they are golden round the edges. After 12mins I pushed them down a bit with a folk to flatten them, but not strictly necessary.

Go forth and spread some pumpkin love!