Showing posts with label craft. Show all posts

Friday, February 5, 2016

Valentines Wreath

I've fully embraced the whole front door wreath thang the Americans have got going on (is it more of a 'thing' in the UK now?). This is my 5th wreath since moving stateside.  I'll be making one for July 4th next! haha!!


I had been wasting time on Pinterest trying to find inspiration for a Valentine's wreath, but despite the billions of wreath ideas out there nothing appealed to me. I think it may be  because wreaths are inherently a little naff?! Oh well, I'm going for the kitsch angle of naff. Then this gorgeous chandelier from The House that Lars Built popped up on my Insta feed...(follow her if you like bright shiny things like I do)


A trip to the craft store to purchase one wire heart (floral dept) and x3 boxes of paper straws and some at home hot glue action my wreath was made.  Do you decorate for Valentine's day? Are you a fan of wreaths? 


My girls & I love it of course, husband yet to comment.  Valentines Day is a kitsch holiday anyway, right?!  


Friday, August 22, 2014

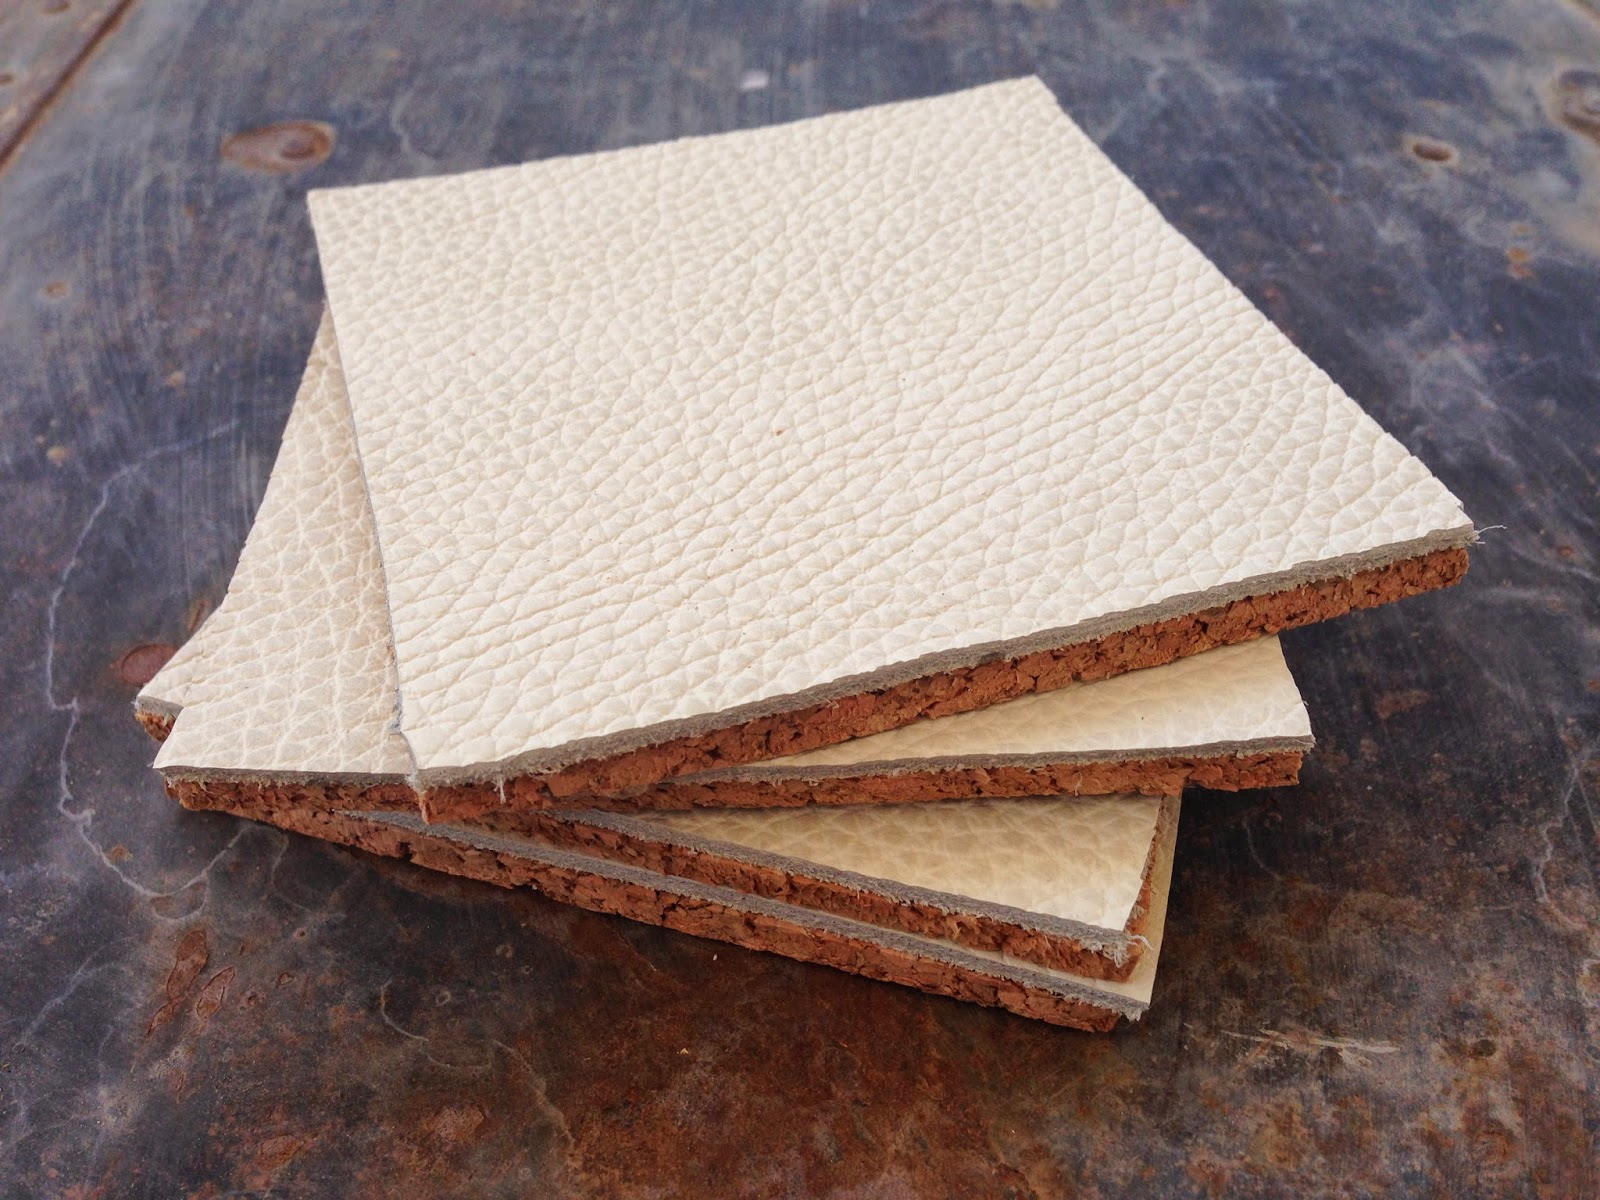
Leather and cork coasters

In my previous life (living in UK) I didn't have coasters, I would have balked at the idea of even owning one.  Possibly due to the 'granny' image or the fact my sitting room was so small we didn't have a coffee table, and therefore no need for a coaster.

Another country and a new perspective; coasters are in my good books.  

Esme & I made these ones a while ago.  One got eaten (seriously) by a friends little boy and one recently got ripped. Cork is great for coasters but these weren't quite durable enough.

Using leather leftover from having a pair of chairs recovered I've made a new batch. More durable and rather more sexy don't you think?!


First up cut out squares of cork and leather (you can get scrap bags of leather from craft stores which would be perfect for this) using an X-acto knife . Mine are 4" x 4".


Glue the cork and leather squares together using a good quality glue.  Don't worry if the squares don't 100% match up, you can trim them up when the glue has dried.


Using masking tape mark out your pattern. I went for geometric, my current love is anything geometric...


A great little craft project which takes no time (hour or so) and uses readily available supplies.  

Any suggestions what to do with the rest of the leftover leather?

Thursday, January 16, 2014

Embroidery for babies

Perhaps the title is a little misleading. I don't actually mean embroidery for babies but embroidery for babies. Get it?

One of my best friends at home (UK) had twins before Christmas; a boy & girl.  I've been rather slow getting round to making them a gift what with Christmas, sickness (yup we had the lurgy for Christmas too) and a family ski trip all happening straight after their arrival into the world. Anyhow that's my excuse....


Nicola (of a Pip and a Peach fame) introduced me to embroidery. She gave me this pattern last year when she came to visit; the fruits of which now hang in my youngest daughter's bedroom. I thought I could utilise the same pattern for the twins as it had a boy & girl version.

Embroidery is a great sewing skill to add to your repertoire.  Its gratifyingly easy and you get results fast.  There are many super cute designs out there, Etsy is a great source in case you are looking.  There are many ways to get the image onto the fabric, this YouTube video explains them well.  I just traced mine through the fabric.


Did I forget to do her legs???!

I added a back to these two as they are a gift. Gather in the edges of the fabric by pulling together with a running stitch then secure with a knot. I then hot glued the backing fabric to the other fabric.  You could also sew the two pieces of fabric together.


Welcome little babies :-) xx


Thursday, December 12, 2013

Wooden Christmas Trees

The American ways are slowly creeping into my being. One of which is to decorate every surface in every room at 'holiday' time.  I love Christmas and am so excited we will be in our own home this year; so its not been hard to embrace this tradition.   


Hello to my forest of wooden Christmas trees! Aren't they cute?!  

I started with a strip of balsa wood (3/32"x 4"x 36") which you can get from craft stores for a couple of bucks.


Using a craft knife & ruler cut out 2 triangles of equal size. My largest was 6" tall and the width of the wood which was 4". Find the centre line of the triangle. The first tree I drew this on but after that I did it by eye which was easy when you use a cutting mat.  Then cut a notch a few millimeters wide from the top of the triangle to the centre point on your middle line.  Then repeat from the bottom up.   


Now slot the triangle together to make a Christmas tree!


You can use the off cuts to make up smaller trees.  I used up the strip of balsa wood and it gave me 7 trees.


The forest took less than an hour to make and cost only a few dollars.  And its great therapy to stop, sit down and make something at this busy time of year. Well it is for me anyway :-)

Happy Christmas!


Sorry girls, no inflatable Santa on the front lawn. You have to draw a line at some  point.

Sunday, October 6, 2013

New baby gift - Owls in a tree

I love making gifts for new babies, fortunately I have friends who are still having babies!  This time around I went for a new idea, owls in a tree. I decided to personalize the gift (like this one) and luckily her name has only 3 letters.

The owls were made from fabric scraps and felt. I made a pattern then cut all the pieces out put them together, either sewing or gluing (felt pieces).  I put a few small bells inside so they can rattle in her little hands.


The 'tree' is an oatmeal container wrapped inside & out with felt. In my haste I forgot to do the inside first (hence not done in the pictures), I would suggest doing it first before sealing up the lid of the container. I used the lid as a template to cut out the hole and a permanent marker to draw the faux bois on the outside.


What new baby gifts do you make? Do you have a 'go to' one, or do you like to try new things?

Thursday, October 3, 2013

Geometric mobile

In the summer I went to the Renegade Craft Fair in LA.  Many of the vendors were big Instagrammers and I started following several of them. I love it; now I get to steal see great ideas from what super crafty people are up to.  One of those people was Robert Mahar.  He also posts YouTube videos on how to execute his projects; gotta love that sharing!

My take on Robert's geometric mobile
I knew I wanted 'something' to fill the space but couldn't seem to settle on anything. Then I saw this great geometric hanging pendant (see image below) and it got the cogs turning...Unfortunately not quite turning enough for me to be able to replicate but enough to decide on something geometric and hanging.

Image: via ahouseinthehills.com
So I plumped for Robert's mobile, a take on a traditional mobile from Finland.  The supply list is minimal - coffee stirrers & craft thread. 


Don't you just love the neon stirrers?! I won't go through the process as its done so well on Robert's YouTube clip, and it really is very easy.

First basic shape

Mobile taking shape


What to do with the other 900 coffee stirrers?! I am thinking mini ones as Christmas tree decorations.  Any other suggestions?

I also think the wall is still a little bare, further thought required on that one...


Monday, August 19, 2013

DIY outdoor chalk board for kids

Sidewalk chalking is a big thing here in the USA, more so than in the UK, and my girls love it as much as the next.  I'm happy for them to scrawl all over pavements in the park but not so happy to step out of our back door and see their 'art'. I put it down to the neat freak in me and the lack of rain here which means you are stuck with said 'art' for weeks (unless of course you bother to hose it off!).

I decided to make a chalk board for the girls to scrawl/doodle/draw on until their hearts are content with the added bonus of covering up our dilapidated fence.

Darn easy project if you've got a fence to hide and/or artistic children:-)

Materials:
  1. Sheet of regular plywood - ours is a massive 8ft x 4ft which is the width between fence posts so easier to secure.  HD or Lowes will cut to size for you. 
  2. Chalk board paint.  I got mind from Lowes and just under $10 for the tin (I used all of it for our board).
  3. Primer. I used some I had left over which was actually white.
  4. Screws to attach to fence. We added a baton of 2x4 across the top for added strength as its so wide.
  5. Bucket of chalk
One coat of primer, 3 coats of chalkboard paint, one evening of taking the fence apart then rebuilding (not my idea!) and we have a chalkboard.


Beautiful bucket of chalk. Looked like this for about 1 day...
Fortunately we've had a few cooler weeks (low 30's) so they have been able to use it.  I think I'll invest in a sail shade to rig up so they can use it more in the summer.  Although when its too cool for the pool it will be a welcome garden activity.

Are your kids chalk fans? Get making a board!

Monday, February 11, 2013

Quick Valentine cards

Not long until the big V day.  These cards are so quick and easy to do and use supplies you normally have at home already.  It is great craft activity to do with the kids; given they usually have 30 odd to do these leave them plenty of time to get writing the names!


I bought a pack of cards & envelopes from Joann's but you could do postcard style and cut the card yourself (reducing cost).  We had poster paint so I used that and watered it down a little which makes a better flicking/spraying action. The heart was cut free hand from another piece of card. I ended up using a couple as they got harder to get off the more painty they got.


Using a little spray adhesive stick on the heart and flick away!


We found just bending the card levered up the heart enough to peel it off put it onto the next one.


Now onto writing those names....

Happy Valentine's Day x

Wednesday, August 8, 2012

New baby gift

Finally I have finished the gift for my friends new baby who is now over a month old. I am not sure what took me so long; I am normally very prompt with my new baby gifts! The delay was partly due to my indecision on what to make for her.   I have done blankets in past, this one & this crochet one and bunnies but as my friend is a good sewer and her Mum even better (she's made the baby a quilt) I thought those options were out.  I spent a week or so toying with the idea of a mobile like these I saw on Pinterest but then this pin sparked an idea....

And here it is! Not quite sure what to call it? I finished it last night so no pictures I'm afraid, but I will take you through step by step, recipe style.


You will need:
  • fabric scraps
  • photo frame of choice
  • freezer paper
  • printer
  • scissors
  • sewing machine or needle & thread
  • fabric glue
  • Fray Check
First draw and cut out your letters. I ended up doing them free hand (as you can probably see!) but you could print out a template & trace them. Coat the edges with fray check.
Work out the text you want to use in Word, I decided on birth details.  Next cut a piece of fabric & freezer paper to fit the size of your printer (mine was A4). Iron the shiny side of the freezer paper to the back of the fabric. This will bond the freezer paper to the fabric and give the printer something to hold onto. Feed fabric into printer, make sure you work out which way round it has to go before you print (mine was fabric faced down). Then print text onto fabric.
I spent a little while fiddling about with the positioning of the letters then when I had it right I secured them with a dab of fabric glue before sewing them on. I also glued the fabric to the back of the frame to hold it all in place.

Welcome to the world baby Summer xx

Friday, December 9, 2011

Thrifty find

I bought this wooden cupboard months ago for 14 bucks from Goodwill and have finally got round to finishing it.  I fell out of love with it over the months, as you do when projects kick about for ages.  I am happy to report we are right back there after I finished it off & filled it with my daughter's favourite trinkets (OK my favourites of her trinkets).


Managed to get the maps in another project. That atlas for a dollar from a yard sale was a dollar well spent.