Friday, March 30, 2012

One down....Nine to go

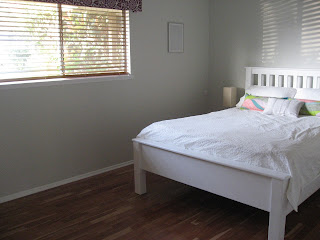
The duck is broken, or in other words I have finally finished decorating the guest bedroom.  I decided to do the guest room first for a number of reasons; it had the least amount of furniture in it (therefore less shifting around), it was a neutral colour to start with (minimal coats of paint required) & my lovely friend and her baby were coming to visit. I like need a deadline to work towards!  I got the walls painted before J & P arrived then had a break for a couple of weeks whilst they were here, & finally finished off this week.
Before
It has turned out quite 'pretty', which isn't necessarily my taste, however I wanted the decor to have universal appeal.  But I am loving the thrifted elements.
After
I think I love the bedside tables the best! Recognise the the vintage soda crates?  Two sandwiched together make a perfect side table.  They could do with a piece of glass cut to size for the top, at the moment old InStyle magazines are doing the job.  The  bedside lamps were $16 for both of them from my local ReStore, what a bargain!


Also another thrifted find was the embroidery hoops, $6 bucks for the three.  The girls and I loved going through my fabric stash to find the right fabric to go in them.  I like the thought that I can change the fabric when the mood takes me.  The idea is all over Pinterest (what idea isn't?!).
Other elements of the room - pictures are prints from the Guggenheim Museum in Bilbao, Spain, chair from my mother in law (I think!), bedlinen & cushions from Ikea.  I am on the hunt for a picture to go above the bed...


Padded Pelmet

To set the record straight, I am not really a padded pelmet sort of a person.  However it seemed to be a good fix as a window dressing in our guest bedroom.  There is a functional, good quality wooden blind on the window left by the previous owner so it seemed crazy to get rid of that and spend a heap of money/time making something else. Enter the padded pelmet! There are loads of  "how to's" out there which I used for guidance, I found Jenny's at the Little Green Notebook the most helpful.  I want to show you how I made mine as it is slightly different, and I think a better method (sorry Jenny!).


Materials required

  • foam core board
  • wooden batting - I used 1"x1" and got the helpful chap at Home Depot to cut it to the desired length
  • gaffer tape (love a project that uses gaffer tape)
  • fabric 
  • quilters batting
  • x4 L shaped brackets
  • Drill
  • Stanley knife
First off you need to decided on the dimensions of your pelmet, it depends on the window size.  Mine is 7 inches tall & 5 inches deep (ie. the sides are 5"x7"). As I said I got the wood cut to size at Home Depot so then just had to cut the foam board to size. If you have ever used this stuff before you will know what a pain it is to cut.  I found the best method is three strikes for each cut, if you see what I mean.  First cut goes through outer layer, second middle foam layer & last cut through the bottom board. Once you have cut your pieces gaffer tape the thing together.  
I then attached the wooden batting using the staple gun and gaffer tape (for luck).  Attach 2 of the L shaped brackets in the corners and add on your side panels.


Now move in from the garage! Once you have cut the fabric and batting to size (don't worry if their is a join in the batting, it won't notice, but I would try to use a continuous piece of fabric) lay them out together on the floor.  Start by stapling the fabric & batting to the inside edge of the wooden rod.  I started in the middle of the pelmet and worked towards the corners.  When you get to the corners fold it round like wrapping a present. I'm not gonna lie, it was a bit of a bodge!
Along the bottom I double folded the fabric to give a neat edge and also enough bulk so the staples wouldn't show through on the front of the pelmet.
Attaching it to the wall required a little more thought, and the services of Mr Maker.  Essentially we attached the other L shaped brackets to the wood & then into the wall.
What do you think? I might just be converted to the way of the padded pelmet!

Tuesday, March 20, 2012

Thrifting

So it is now a post a month; all I can say is I'm not proud of my lack of commitment but I will try harder!  Thank you Kate for the gentle nudge to get me going again.  Needless to say I have not been resting on my laurels this past month.  I have decorated the guest bedroom & painted the spare bed.  When I have finished the last few snags on the list I will give you the grand reveal.


Visiting the thrift store(s) has been a constant over the past months, despite moving house and having visitors so I thought I would share some of my finds with you.  Moving house has given my thrifting a renewed focus & energy.  Thrifting is big here in the USA.   I am curious of others thrifting habits - How often do you frequent your local thrift store?  How far do you travel to solely visit a thrift store?  Do you ever haggle on price? Go on, share you secrets with me!

This old glass lampshades were $4 for the 3 of them from our local ReStore.  I am hoping Mr Maker will be able to make them into something like these ones I've seen at Terrain & cb2, for a fraction of the price of course!
firefly pendant lamp - CB2

Mason jar pendant - Terrain
My best score was this mid century modern side table, only 10 bucks from Goodwill.  It is a bit of an odd size - too big for a side table, too small for a coffee table. As you can see from the pictures it has a few scratches but I think I can get those out, and if I don't find a home for it I can always sell it on for a profit. Kerching! 


I like to have one (or maybe several) constants when thrifting; something I always keep an eye out for even when I am on the hunt for a specific piece. At the moment that constant is plates or trays.  I want to decorate one of the kitchen walls with plates, as I've seen on Pinterest.
apartmenttherapy.com. Lisa & Clay's home
The collection has started with a kitsch tin tray from 1971, actually made in the UK ($3 Goodwill) and a bold flower motif plate/tray which was expensive at $15.  A great start to the collection though.
I hope you like my purchases. Not 'makes' I know but they will be made part of our lovely new home, ahhh!