Thursday, November 1, 2012

Pumpkin Oatmeal and raisin cookies

I came across a pin on Pinterest which detailed numerous acts of kindness a Mum & her kids did. It got me thinking. My girls are pretty good most of the time and do show empathy towards others close to them however they have little grasp of the wider world (kinda understandable, they are kids).
I thought random acts of kindness would be a fun thing to do with them.

In keeping with the seasonal pumpkin theme, we made these delicious  pumpkin oatmeal & raisin cookies. Esme then decorated lunch bags to deliver them in.  The girls discussed who we should give them to, their ideas not mine.  The recipients were several elderly neighbours, the lollipop lady, the helpers at the YMCA kids club & the builder who is currently banging away in our bathroom.  The girls were super excited to hand them out and the cookies were really well received. It made all of us feel nice inside :-). We are now thinking we will do the same at Christmas and maybe even Thanksgiving!


Pumpkin oatmeal & raisin cookies

2 cups plain flour
1 1/2 cups of old fashioned oats
1 tsp baking soda
2 tsp cinnamon
2 tsp ginger
grate of nutmeg
pinch of salt
1 cup of unsalted butter (2 sticks)
1 cup brown sugar (light or dark, I used dark)
1 cup white sugar
1 cup pumpkin puree
1 egg
tsp vanilla extract
1 cup of raisins
Handful of white chocolate chips (not necessary, but nice!)

This quantity makes LOADS! I forgot to count them but it was 3 tray fulls.

Oven at 350F.  Line baking sheets.  Combine the dry ingredients - flour, oats, baking soda, spices, salt in a bowl.  In a separate bowl use an electric mixer to beat butter & sugars until they go pale and fluffy. Then add the pumpkin, egg & vanilla extract to the butter mixture.  Beat to combine. Add the flour mixture, a little at a time until it is all combined.  Stir in the raisins and chocolate chips if you are using. 
Use a desert spoon to drop mixture onto baking sheets. They don't spread out that much so you can squish them on.
Bake for about 15mins (check after 12) or until they are golden round the edges. After 12mins I pushed them down a bit with a folk to flatten them, but not strictly necessary.

Go forth and spread some pumpkin love!


Monday, October 29, 2012

Symmetry in night stands

I am feeling a tiniest bit guilty as we have started our bathroom remodel and here I am sat at the computer. In my defense I have done a dump run (What an experience; US dumps are MEGA in comparison to our little UK ones!), cleared up after my husbands demo yesterday & attempted to get the vinyl floor tiles up. If I take a closer look my guilt may be because I gave up a little too quickly on those floor tiles...

Anyway back to the safety of completed projects.


Matching nightstands seem to appeal to the slight OCD in me, I like the symmetry.  This is the first time we've matched on both sides of the bed; my previous bedside table is one my Grandpop made (he was a carpenter) in the 50's so I was loathed to replace it.  However my husbands was not so pretty, nor did it hold such sentimental value - he picked it out of the dump (literally) about 5 years ago. Of course we still have Grandpop's table but the dump find has returned to its humble beginnings.

This pair of nightstands were a Craigslist find for $25. I picked them up on the way home from dropping my daughter at playschool, I think she would have given them to me for free she was that desperate to get rid of them.  They are really quite sturdy, more so than Ikea, & cost a lot less too. Gotta love Craigslist!


They required a heavy sand down and 2 coats of primer before I started painting.  I used paint I had; white used for trim & the grey is from my daughters desk.  The handles were also 'free' from Home Depot as I had a rebate card from some paint offer.  


What you have beside your bed says a lot about you. Me - book (Barbara Kingslover: Prodigal Summer), InStyle & The  Week magazines, a picture from India, heart made by my niece & nephew, Bliss hand cream (the best) & alarm clock. My husband - Bike Snob book, Wired magazine & Bird clock.  He is a bike loving, techie twitcher.

Does your bedside table reflect you?!  

Back to those floor tiles...

Friday, October 26, 2012

Cheap as chips curtain rod

The sun comes blazing into our bedroom window most of the day which I am just starting to appreciate as autumn has finally arrived here in Southern California.  Consequently we knew we would need a pretty heavy duty shade, to keep out the heat as well as the light.  After trawling the internet blinds.com came out the cheapest. I chose a cellular black out shade in white, and as the window is 94" wide, its quite a piece of kit.  So I decided to go for curtains as well to soften the window a little and give a splash of colour to the room.

After a rather pricey blind I was looking to save a bit of cash on the curtains & curtain rod - no easy thing with an 94" wide window. Fortunately this post at Houseofhepworths.com explains how to make a cheap curtain rod - result!

Curtain rod ingredients

10ft electrical conduit pipe (Home Depot) - $3
can of spray paint (Walmart is cheapest) - $3.79
wall brackets x2 (Betydlig Ikea) - $3
end finials x2 (Vasentlig Ikea) - $5
Curtain rings (Syrlig Ikea) x2 - $8

Cut pipe to desired length (the kind chaps at Home Depot will even do this for you).  Spray paint it desired colour, I went for white. Fix brackets to the wall. To achieve a faux pinch pleat attach the curtain hooks to inside of the curtain about an inch or so below the top.


Thread onto the pole leaving one ring on the outside of the bracket.


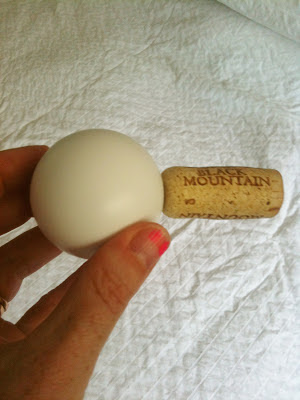
Attaching the finials to the end of the rod could not be easier. Lo and behold a wine cork is exactly the right diameter! I knew there was a good reason I drank lots of wine!  Screw your chosen finial into the cork then cork your rod, as the saying goes..


Once again apologies for poor iPhone pictures.


And here are the finished hanging curtains with my cheap-as-chips-curtain-rod.   You honestly wouldn't know, I would highly recommend doing this if you need a longer curtain rod. As for the curtains they cost a total of $34; $20 for the fabric from Ikea and $14 for a king sheet (from Walmart) which I cut in half. 

$57 for curtains & curtain rod is my kinda of DIY project.  The master bedroom is now finished. Post to follow shortly...


Friday, October 19, 2012

Pumpkin bread

Friends are coming round for coffee tomorrow morning and I was going to make my usual coconut bread. After a passing scroll through twitter there was no ignoring the fact it was Fall Autumn and all things pumpkin. I found this great recipe and thought we should have a slice of this bread instead & embrace the season; depsite the fact its still 30 degrees outside! 

Pumpkin bread
This recipe is adapted from Ann Marie @whblsblog

1 cup of plain flour
3/4 cup of wholemeal flour
1 cup of brown sugar
1/2 cup of castor sugar
1 tsp of grated nutmeg
1 tsp of cinnamon
1 tsp of ginger
1 tsp baking soda
 pinch of salt
1/2 cup of oil (I used canola)
1/3 cup of water
2 eggs
1 cup of canned pumpkin (unsweetened)
1 cup of raisins

Pre heat the oven to 350F. Grease & flour a loaf tin.  Mix the dry ingredients together in a large bowl.  In a separate bowl whisk the eggs and add to the dry ingredients along with the oil, pumpkin & water.  Using an electric whisk/mixer thoroughly mix to combine.  Stir in the raisins.
The mixture is quite runny, so pour into your pre-greased loaf tin. As you can see mine was/is rather full. Ann Marie does double quantities and suggests using 3 loaf tins...She also uses all plain flour, castor sugar & adds chocolate chips. So feel free to create your own version (although she SWEARS hers is the best so you may want to give it a go!).

Bake in the oven for an hour, or until a skewer comes out clean.  It is divine warm out of the oven but just as good the next day, apparently.


It is a great loaf, and nice to mix things up. It will be a Fall staple from now on!


Friday, October 5, 2012

Upholstery for beginners and bodgers

When I was very little my Mum did an upholstery course. The chair she reupholstered is still going strong at their house, I think she may have had it redone recently as it's not 70's brown velvet anymore but it certainly lasted a good 20 years. Ergo I have always fancied having a go.  
Whilst back in Winchester I enrolled for a course run at a local school.  I managed 3 weeks.  Let's just say it wasn't quite what I was expecting (boring, lots of standing about waiting for help).  Never the less my upholstery spirit has never been dampened!

The chair from the upholstery course came with us to the USA & I knew I wanted to cover it.  I decided to use the Amy Butler fabric used for the blinds in our old bedroom (see here) so I painstakingly unpicked them; feeling extremely virtuous with myself for being so thrifty.
Finished chair


 Doesn't it look great?! I am so pleased with the result, and it really was not too difficult. 
Before
As you can see from the before picture the chair has great shape, just not so great green vinyl covering it.  
The first job was to fill the joins in the arm rests. I used caulk which I'm sure is not the best thing to use, but it did the job.  I then stained the arm rests and legs a slightly darker and more uniform colour.  My choice of stain was dictated by the size of pot, I believe the colour was ebony. 
I took the back off as this was attached using rounded headed upholstery pins  which I saved. I then used the original back as a guide to cut out a new piece.


Next the removal of the side covering, again I kept this as a template to cut out my fabric. It was also useful as a guide on how to affix the new piece.


I made the covered cord from a length of cord I already had. Just put on the zipper foot et voila!


I had made the decision to leave the original seat & back. Removing them would take it from a Saturday morning job to a weekend job, I'm no purist, who cares its not fully upholstered?!  The seat and back where two separate pieces of fabric which I attached using the staple gun.  You need to keep smoothing a gently pulling it to ensure the fabric is taut and flat.  I folded the corners, see pictures below, and tucked it into the back seam, securing with staples either side.


Attaching the side band of fabric required a little brain power to suss out the best method.   Having cut out the correct sized piece of fabric (measure from the one you removed) iron a small hem along one long edge. This edge will then butt up against the piping.  Then hold the piping in place (you may want staple it) then staple the band of fabric under the folded hem.  This is easiest if you flip the fabric over onto the chair (see below).  


Fold over the fabric, smooth down and staple underneath the chair.  Work round the chair from back to back.


Lastly I ironed a 1/2" hem around the back piece of fabric and stapled it to the  chair. You need to evenly space the staples and try to use as many staples as you have upholstery pins to cover them.  My bad; I was a bit trigger happy with the staple gun and didn't space them evenly, hence no back shot of the chair! It is against the wall so it doesn't really matter.

A couple of hours later, one upholstered chair. I learnt a life lesson here; I like to work things out for myself, why waste my money & time on courses?! 

What have you 'taught yourself' to do? Satisfying isn't it?


Thursday, October 4, 2012

Buttermilk, blueberry breakfast cake

Yup, I'm still alive!  Laptop in pieces (literally) for months and camera out of action (dropped down a cliff whilst climbing, him not me) = no blogging. My clever husband fixed the mentioned laptop, sadly not so successful with the camera.  So apologies for bad iPhone pictures from now on!

During the radio silence I have been busy making, DIY, sewing, thrifting and enjoying the summer we are still having in Southern California.  So there are a zillions-ish blog posts whirring around in my head; I shall endevour to catch up on them now I have a functioning computer. Meanwhile on with the breakfast 'cake'.

I saw the recipe on Pinterest and knowing I had a box of rather sour blueberries that needed eating in the fridge knew I would be making it sometime soon.  The recipe is from Alexandra's Kitchen, a great blog with loads of yummy recipes.  I have adapted her recipe slightly by using wholewheat flour & brown sugar, thus kidding myself its slightly healthy.

Buttermilk, blueberry breakfast cake
1/2 cup of unsalted butter (1 stick)
zest of a lemon
3/4 brown sugar
1 egg
1 tsp vanilla
2 cups of wholewheat flour
2 tsp baking powder
2 cups of fresh blueberries tossed in a little of the flour
1 tsp salt
1/2 cup of buttermilk (I sloshed in a bit more)

Oven at 350F.  Cream butter & sugar with the lemon zest until pale and fluffy.  Beat in the egg and vanilla extract.  Add flour, baking powder & salt to the mixture a little at a time, alternating with the buttermilk.  Once all combined fold in the blueberries.  Line a tin (mine was 10"x7") with greaseproof paper and spread in the batter.  Bake in the oven for 35-45mins, its done when browned on top and a skewer comes out clean.

It is a lovely and light and fluffy (even using wholewheat flour) and no need to wait to breakfast, I haven't.


Tuesday, August 28, 2012

Quilt number 2

Always satisfying to finish a project, especially when you have several others requiring attention.  Mr Maker is away at the moment so its a perfect opportunity to bang out a few projects; an evening sewing with the radio on (or trash TV) is my idea of relaxation.


Onwards and upwards.....

Sunday, August 19, 2012

What to do with those courgettes (zucchinis)

First of the season in June
Most people I know who grow veggies grow courgettes. Most people I know who grow courgettes have an abundance (note to self; 2 plants are plenty for our family). Fortunately we all like them in their basic form - sautéed, griddled or steamed however to have a few recipes up your sleeve is great for when the glut kicks in and those lurking under the leaf canopy turn into bloated beasts.


Courgette or marrow pakora
2 cups of finely chopped marrow
2 small red onions chopped
2 green chillies chopped (more if you want them hotter)
3 cups of gram flour
approx 1 1/2 cups of water
handful of chopped curry leaves
Pinch of salt
1 tsp turmeric
1 tsp chilli powder
1 tsp gram masala

Mix the dry ingredients in a bowl.  Stir in the onion and marrow.  Gradually add the water to the flour mixture until a stiff batter forms.  You may not need all of the water.  Leave for 30 mins.


Heat oil (I used peanut oil) to just smoking point. We shallow fried so had about 3" depth of oil. Drop about a tablespoon of mixture into the oil and turn frequently until golden on all sides. Drain on paper towel and scoff.


Courgette chocolate cake
120g butter
125ml sunflower oil
100g castor sugar
200g soft brown sugar
3 eggs beaten
130ml milk
350g plain flour
2tsp baking powder  
4 tbsp cocoa
450g courgettes finely grated
1tsp vanilla 

Grease and line a 20 x 35cm tin.  Preheat oven to 180oC. Grate the courgettes first, draining off any excess liquid.


Mix the butter, oil and sugars until light and fluffy.  Gradually add the eggs, a little at a time then the milk to the fats and sugar.  Sift the flour, baking powder and cocoa together then fold into the mixture.  Stir in the courgettes and vanilla.


Spoon into the tin. Bake for 25-35mins until firm on the top and skewer comes out clean.  Cut into squares whilst still warm. It is a variation of carrot cake, moist and delicious!


This picture is from the Little Green blog as I forgot to take a picture of my finished cake!

Smashed courgette dip
This is a Jamie Oliver recipe

extra virgin olive oil
2 cloves of garlic finely chopped
1-2 small red dried chillies crumbled 
(or fresh red if you have them in your garden)
Jamie says 6-8 small courgettes cut into chunks - I say use as many as you need to use up
salt & pepper
handful of mint, chopped
juice of one lemon

Put a good dash of olive oil into a hot pan and fry the garlic and chilli for a few minutes.  Add the courgettes and stir to coat them.  


Turn the heat down to low and put a lid on the pan.  Leave them for a good 30mins, giving them a shake now and then so they don't stick on the bottom. When the courgettes are really soft and mostly broken up take them off the heat.  Add a good dash of olive oil, lemon juice & mint.  Give them a taste, they may need more S&P and a chopped fresh chilli if you like things hot.  Serve with pitta chips or toasted bread.

Our courgette plants are coming to the end of their life so these recipes will not come out again for another year. I like that; I think you call it seasonal cooking.


Wednesday, August 8, 2012

Mini quiches

My eldest had her first day of Kindergarten today and I am pleased to report all went well.  She has lunch at school (at the ridiculously early time of 11.06).  I have been trying to come up with lunch items that will withstand the morning in a lunch bag hanging outside in the 40oC sun. No tuna sandwiches here thank you! We are trying mini quiches this week which is actually something I used to make for them as toddlers (good finger food).  They freeze well, then I pop them in a pot in her lunch box frozen so by lunch they are nicely chilled.

Mini quiches
Makes about 12

4oz plain flour
4oz self raising
4oz butter 
pinch of salt

knob of butter
1 onion finely chopped
large handful of grated cheese
dash of milk
3 eggs beaten

350F (180oC) oven

First make the pastry, I always do mine in the Magimix.  Cut up the butter into small knobs and add to flour.  Blend flour and butter until it forms a crumbly texture.  Add cold water until the mixture comes together and forms a ball.  Wrap the pastry in cling film and put in the fridge to rest for at least 30 minutes.
Meanwhile melt the butter in a saucepan and add the chopped onion.  Leave over a low heat with a lid on until the onion is soften (at least 15mins).  Try to leave it to cool a little before you need it.  Grate the the cheese and put to one side & whisk up the eggs in a bowl.
Remove the pastry from the fridge and roll out on a floured work surface (you may want wait a few minutes to make rolling out easier).

As you can see mine cracked round the edges. Don't worry about that you can keep collecting it up and re rolling. I used the wine glass as a pastry cutter as couldn't find mine.  Put the pastry discs into a greased tin. I used my muffin tin this time so they were a bit more substantial for lunches but normally I would use a mince pie tin.  Next add the filling.

Onion first then cheese and finally the egg mixture.  I use a turkey baster to add the egg as you don't want to over fill.  

Bake in the oven for about 30 minutes, until they are golden on top & the pastry is cooked through.  Allow to cool in the tin for a few minutes then transfer to a wire rack.

They are lovely warm, but as I said I freeze them when cool and they are just as good cold (or reheated).
You can add all sorts of other fillings - ham, peppers, courgette or sweetcorn.

I'm thinking savoury muffins for the next weeks lunches....