Showing posts with label cooking. Show all posts

Friday, February 5, 2016

Cinnamon and raisin sweet potato cookie bites - grain, gluten, sugar and dairy free. Paleo & AIP

When I come across an AIP compliant biscuit/cookie/muffin/baked item I Pin it. I'm amassing quite a collection now and getting the hang of baking AIP style. The results are different from regular baking & even straight paleo, but not necessarily in a bad way and there are a few tricks to ensure success.  I end up adapting most recipes to suit my tastes or tweaking to make even more yummy! This recipe is a tweaker from Healing Family Eats which is a great website for those following an AIP diet.

Cinnamon and raisin sweet potato bites

1 cup of mashed sweet potato (1 medium sized sweet potato)
1/2 cup of unsweetened shredded coconut
 1/3 cup of softened coconut oil 
2 tbs molasses
4 tbs coconut flour
1 1/4 tsp cinnamon
1/4 tsp baking soda
1/2 cup raisins

Oven 325F. Line a baking sheet with parchment paper.

Puree the sweet potato and shredded coconut in a blender to smooth out the mash and break up the coconut. Add in the rest of ingredients, except the raisins, and pulse until well combined.  Stir in the raisins. Using an ice cream scoop, scoop out the dough or roll balls of dough in your hands and place on the baking sheet.  Be warned the mixture is quite sticky!  Flatten the balls by pressing down lightly with your hand.  They don't spread out much during baking. Bake for about 30mins. The bites will crack a little and slightly brown at the edges.  Leave to cool completely on the tray, they will be quite fragile (it helps to make them on the small side). Store in the fridge to keep them firm.  I made 15 mini bites. 


Sweet potato morphed into a cookie format. How good is that? Does anyone know another version of sweet potato cookies? 


Friday, February 21, 2014

Carrot cake cookies

You know you just can't have enough snacks in the house, right?! I like to bake some form of snack every week for the family; something that I can eat and that's a bit on the healthy/filling side for the girls.  The doughnut maker is having a rest so I was on the look out for something new.  
I came across the Paleo Mom and got sucked into to her site for quite sometime.  So much so I have ordered her book, "The Paleo Approach: Reverse Autoimmune Disease and Heal your Body". As someone who suffers from x3 autoimmune diseases I thought it might be worth a read ;-).

Anyhow, the recipe below is adapted from her Carrot Cake bites.


Carrot cake cookies

1 cup grated carrot
3/4 cup cashew nut flour
1/2 cup dates (pack them in!)
1 1/2 cups blanched almond flour
2 tbsp coconut flour
1 egg
1/4 cup softened unsalted butter
3/4 tsp baking soda
1 tsp ground ginger
1 tsp cinnamon
1/2 tsp mace
pinch of salt
1/2 cup sultanas or raisins


Preheat oven to 350F & line a baking sheet with either a silicone mat or parchment paper.

Add the dates and cashew nut flour to the food processor and pulse until it forms a sticky paste.  Then add the rest of the ingredients except the sultanas and mix until well combined. 


Then stir in the sultanas by hand. Now comes the sticky part; first wet your hands then roll the mixture into evenly sized balls (about palm sized). Place then on your baking sheet and flatten with your hand.  They don't spread much so you can pack them in. 

Bake for 15mins, they will start to crack and look slightly more golden in colour.  Remove from oven and cool on a wire rack.  I can't remember how many it made - it was a tray full of well packed in cookies.


They are moreish little bites packed full of goodness.

Have a great weekend xx


Saturday, July 13, 2013

Chocolate chip & walnut almond cookies

We are off camping for a few days to the beach and as any camper knows you need plenty of scooby snacks on a camping trip.  


Chocolate chip & walnut almond cookies

This recipe is adapted from here

 1/2 cup of unsalted butter
3/4 cup of soft brown sugar
2 eggs
3 cups of almond flour (finely ground blanched almonds)
1/2 tsp of baking soda
pinch of salt
dash of vanilla extract
1/2 cup of chocolate chips
1/2 cup of walnut pieces

Set the oven to 375F.

Cream the butter and sugar together until pale and fluffy. Beat the eggs together in a separate cup then gradually add to the sugar and butter, beating all the time.  Next mix in the ground almonds, salt, baking soda & vanilla extract.  Lastly stir in the chocolate chips and walnuts.  NB: the mixture is moister than normal cookie dough. Dollop tablespoonfuls of the mixture onto a lined baking tray.  


They don't spread as much as normal cookies so squash them in.  Bake for 10-12 mins or until they begin to brown.  Leave to cool on the tray for at least 5 mins as they are quite soft to start with.  This quantity & size made nearly 30.


Not a regular chocolate chip cookie but pretty tasty nevertheless!  


Thursday, November 1, 2012

Pumpkin Oatmeal and raisin cookies

I came across a pin on Pinterest which detailed numerous acts of kindness a Mum & her kids did. It got me thinking. My girls are pretty good most of the time and do show empathy towards others close to them however they have little grasp of the wider world (kinda understandable, they are kids).
I thought random acts of kindness would be a fun thing to do with them.

In keeping with the seasonal pumpkin theme, we made these delicious  pumpkin oatmeal & raisin cookies. Esme then decorated lunch bags to deliver them in.  The girls discussed who we should give them to, their ideas not mine.  The recipients were several elderly neighbours, the lollipop lady, the helpers at the YMCA kids club & the builder who is currently banging away in our bathroom.  The girls were super excited to hand them out and the cookies were really well received. It made all of us feel nice inside :-). We are now thinking we will do the same at Christmas and maybe even Thanksgiving!


Pumpkin oatmeal & raisin cookies

2 cups plain flour
1 1/2 cups of old fashioned oats
1 tsp baking soda
2 tsp cinnamon
2 tsp ginger
grate of nutmeg
pinch of salt
1 cup of unsalted butter (2 sticks)
1 cup brown sugar (light or dark, I used dark)
1 cup white sugar
1 cup pumpkin puree
1 egg
tsp vanilla extract
1 cup of raisins
Handful of white chocolate chips (not necessary, but nice!)

This quantity makes LOADS! I forgot to count them but it was 3 tray fulls.

Oven at 350F.  Line baking sheets.  Combine the dry ingredients - flour, oats, baking soda, spices, salt in a bowl.  In a separate bowl use an electric mixer to beat butter & sugars until they go pale and fluffy. Then add the pumpkin, egg & vanilla extract to the butter mixture.  Beat to combine. Add the flour mixture, a little at a time until it is all combined.  Stir in the raisins and chocolate chips if you are using. 
Use a desert spoon to drop mixture onto baking sheets. They don't spread out that much so you can squish them on.
Bake for about 15mins (check after 12) or until they are golden round the edges. After 12mins I pushed them down a bit with a folk to flatten them, but not strictly necessary.

Go forth and spread some pumpkin love!


Thursday, October 4, 2012

Buttermilk, blueberry breakfast cake

Yup, I'm still alive!  Laptop in pieces (literally) for months and camera out of action (dropped down a cliff whilst climbing, him not me) = no blogging. My clever husband fixed the mentioned laptop, sadly not so successful with the camera.  So apologies for bad iPhone pictures from now on!

During the radio silence I have been busy making, DIY, sewing, thrifting and enjoying the summer we are still having in Southern California.  So there are a zillions-ish blog posts whirring around in my head; I shall endevour to catch up on them now I have a functioning computer. Meanwhile on with the breakfast 'cake'.

I saw the recipe on Pinterest and knowing I had a box of rather sour blueberries that needed eating in the fridge knew I would be making it sometime soon.  The recipe is from Alexandra's Kitchen, a great blog with loads of yummy recipes.  I have adapted her recipe slightly by using wholewheat flour & brown sugar, thus kidding myself its slightly healthy.

Buttermilk, blueberry breakfast cake
1/2 cup of unsalted butter (1 stick)
zest of a lemon
3/4 brown sugar
1 egg
1 tsp vanilla
2 cups of wholewheat flour
2 tsp baking powder
2 cups of fresh blueberries tossed in a little of the flour
1 tsp salt
1/2 cup of buttermilk (I sloshed in a bit more)

Oven at 350F.  Cream butter & sugar with the lemon zest until pale and fluffy.  Beat in the egg and vanilla extract.  Add flour, baking powder & salt to the mixture a little at a time, alternating with the buttermilk.  Once all combined fold in the blueberries.  Line a tin (mine was 10"x7") with greaseproof paper and spread in the batter.  Bake in the oven for 35-45mins, its done when browned on top and a skewer comes out clean.

It is a lovely and light and fluffy (even using wholewheat flour) and no need to wait to breakfast, I haven't.


Friday, June 22, 2012

Camping Heaven

We are a family of happy campers and even happier since we've been camping in California. The whole process is easier than in the UK; from the packing up (crates in the garage straight into the boot of the car vs. grovelling through the loft space down 2 flights, walk down the street to the parked car then into the boot) to the packing up at the end of the trip. No wet tent draped over the banisters.


If you are not a camper I urge you to try it, you'll like it!  My friend Nicola at A Pip & Peach has a good list of camping essentials.  Here are some pictures of our latest trip to El Capitan State Beach.  A fantastic spot next to a lovely long sandy beach with rocks for rock pooling.  We even had a swim by of at least 20 dolphins frolicking in the waves. Amazing. As you can see from the map its snuggled up to the freeway; enough beers and you don't notice the trucks any more...
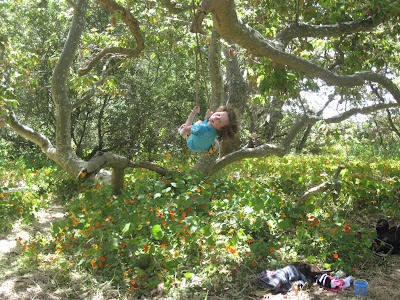
Girls like to climb trees too!

Supper time

Beach action
Camp swing

Compulsory camp food in the USA is s'mores (a biscuit sandwich of chocolate & toasted marshmallow) but we decided to break the mould one night and make chocolate cake baked in oranges. It was worth it!  It was really easy as it uses a packet cake mix (not something I would do at home but very convenient for camping)


First up scoop out the inside of the orange and give to passing child to munch on.

Fill hollowed out orange with cake mix. We filled ours about two thirds full (we had 6 oranges for one box of cake mix) of chocolate mixture.  Put the 'hat' back on the orange and wrap in tin foil.


Put orange parcels directly in the fire & wait! I can't remember how long they took, best to check by opening up one.  
Some exploded out and made light fluffy cake, others were deliciously gooey and uncooked.  Next time we'll rotate their placement in the fire...


Happy Camping!


Wednesday, May 23, 2012

Strawberry jam

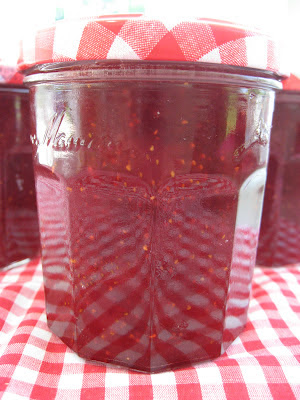
2lb's of strawberries for $1.99, crazy!  That means only one thing to me, jam.
Strawberry Jam
4lbs of strawberries, better slightly under than over ripe
3lbs sugar
juice of 2 lemons
6 jam jars
6 disc's of greaseproof paper

I like to wipe the strawberries clean (mainly because Delia says so, water can dilute pectin apparently) and cut to desired size.  If they are small enough I like to leave them whole however these were hand sized brutes so required some chopping.  Some people like to mash them...Your call.  Put a small plate in the freezer which you will need later.  Put the clean jam jars in a low oven to warm.
Put strawberries and sugar in to a large heavy bottomed pan, all the better if you have a proper preserving one (I don't), and heat gently.  Once the sugar has dissolved add the lemon juice and wack up the heat to bring the mixture to the boil.
Do not be concerned about the scum.  Some recipes say to skim it off at the end, I don't bother. A lot of it dissipates by the time you get to putting it in the jars.  Now the next stage requires patience and stirring.  You need to stay by the pan (once you've had jam boil over you won't leave it again!) and keep stirring to prevent it catching on the bottom and burning.  It takes about 25-35mins for it to reach setting point and to get to a temperature between 209-220F.   Mine took a little longer than 35 minutes and was up to 220F. I would like to say I can look at it and tell when its ready, or judge by the consistency but I can't.  This is where the plate in the freezer comes in.  Put a blob on the plate and if it wrinkles up when you push it (after its cooled) its ready.  Strawberry jam can be a soft set, so in this instance the 'wrinkles' were very slight on the surface of the jam.    
Remove the pan from the heat and stir in a knob of butter, this helps get rid of the scum.  Leave the jam to cool for about 15 minutes before decanting into the clean, warmed jars.  I use a jam funnel and ladle for this process.

A few hours later make yourself a piece of toast and sample the fruit of your labour!


Friday, May 18, 2012

Octonauts Party

I'd like to use the excuse that its taken a month to recover from the birthday parties - but that's not strictly true.....Although there is no denying a full on kiddie party is hard work!  It was  all worth it, to see my eldest squeal with delight to have her friends at HER party.  It was Octonauts themed as requested, most ideas stolen used from Pinterest.  
I hung blue streamers from the archway to create an entrance way into the underwater world.  As kids arrived they went straight to a craft activity, making either jelly fish (from paper bowls, streamers & googly eyes) or fish from paper plates. I would recommend having an activity to hand as people always arrive in dribs and drabs.  
They then played 'Pin the patch on Kwazii', unfortunately we forgot to take a picture of this. I order the poster from Etsy and Mr Maker printed off a super sized version at work.  
Speaking of Mr Maker, his mornings preparation for the party was the map for the treasure hunt. And what a creation that was! (one would hope so as it took him 1 1/2 hrs to draw, yup, really).  The treasure hunt was a great success, and took longer than anticipated which was a bonus.  He put the kids in teams for 2 or 3 and gave them an empty party bag each.  The hunt started when each team was given a picture clue. At this location (e.g. inside washing machine, BBQ etc) they found their beautiful map which was marked with red X's - the treasure bags.  The treasure bags were marked with a letter and contained 'goodies' which they all took, one of from each location.   After visiting every treasure bag they unscrambled the letters to make the word, and win the treasure hunt!
Anyway, enough games onto the food....
The table


Menu
Cheese straws
fish sandwiches
Goldfish (obs!)
carrots & toms + dip
hot dog squid
strawberries
clam & pearl biscuits/cookies
Captain Barnacles cake

fish sandwiches on seaweed

Octopus dip
squid
Pearl clams
My personal favourite are the clams, aren't they cute?!! I bought the biscuits (cookies) and made some butter icing which I coloured pink.  The pearl is a yoghurt covered raisin and the eyes are dots of black icing. 
Captain Barnacles cake
And here is the man bear himself.  Phew, glad the parties are all over for another year! Happy 5th year to a gorgeous girl xxx


Sunday, January 22, 2012

Blood Orange Marmalade

One of the great things about Redlands (where we live) is the abundance of citrus fruits.  The joy of being able to eat home grown fruits and the intoxicating smell of the orange blossom which cloaks the town in spring really feels special.  
Many people have stalls at the front of their houses selling their citrus fruits and other produce from their gardens.  I have my favourite stall which sells satsumas, oranges, pink navel oranges and our households favourite, blood oranges. As far as I know its the only one in Redlands that sells blood oranges.  Fortunately it is on our route to play school so we watch with anticipation for the sign to go up that the blood orange season has started.  We all squealed with delight (seriously!) when on Friday the day had come.
This is the first time I have made marmalade with blood oranges. I have made the more traditional version with Seville oranges back in the UK.  The recipe I use is from Riverford (oh how I miss their veg boxes) whilst still keeping an eye on Delia.
Marmalade really is a labour of love. It can not be rushed and indeed I would allow a good chunk of the day to make it.  But of course this is the pleasure of making marmalade, it does take all day and is all consuming.  And the added bonus is the house is filled with a delicious aroma from the first zesty squeezed orange to the syrupy smell from the final rapid boil.

Blood Orange Marmalade
6 cleaned jam jars
waxed discs
1.5 kgs of blood oranges (or any other citrus fruit)
2 lemons
2kg granulated sugar (approx)
4 pints of water
muslin & string

Cut the oranges & lemons (I didn't have lemons so used limes) in half and juice. I ended up doing it by hand to extract all the juice & goodness.   Put the muslin over a bowl and throw in any pith & pips that come out during the squeezing.

Using a teaspoon scrap all the remaining pith from the skins and put in the muslin. Tie up the muslin with the pith & pips inside to make a little bag.  Next stage is the cutting up of the skins.  It is a matter of taste how finely you like yours sliced, I prefer a decent chunk of peel with my marmalade on toast.  Cut the halves into quarters and then slice.
How stunning are these colours?!
Put the shredded peel and juice in a large heavy bottomed pan with 4 pints of water with the muslin bag tied to the handle & suspended in the pan.  Bring to the boil and simmer uncovered for about 2 hours, or until the peel is completely soft (it should turn to mush between your fingers).
Remove the muslin bag & set aside on a plate.  Measure the contents of the pan, it will be about 3 pints. Return the peel & liquid to the pan (don't bother to wash it) and for every pint of liquid add a pound of sugar to the pan. This makes a sharp tasting marmalade, you may want to add more sugar if you like it sweeter.  Stir over a low heat until the sugar has dissolved, about 15 mins.  Hold the muslin bag between 2 plates (if its too hot to handle) and squeeze out the precious pectin loaded juice into the pan.  
Bring the mixture to a rapid boil and stir occasionally to stop it sticking & catching on the bottom. Now is the time to put a plate in the freezer.  After 15 minutes of rapid boiling give it a test by putting a drop on the chilled plate. If it wrinkles its set, if not boil again for another 15 minutes. A picture of this would be helpful, sorry forgot.  This batch took 30 minutes of boiling.  I have got a thermometer which helps; you need to get to a temperature of 220F (or thereabouts) but I still do the wrinkle test. It can take up to 50 minutes of boiling so be patient! 
When you satisfied you have reached setting point turn off the heat and leave it to stand for 15 minutes.  At this point put the jars & lids into a cool oven (about 200F) to warm.  Don't worry about the scum; you can either scrap it off the top or put a knob of butter in to the pan to disperse it.  Then using a jam funnel & a ladle decant your lovely marmalade into the warmed jars.  Cover with the waxed disc's immediately and screw on the lids to seal. 
I can't wait until breakfast to spread some sunshine onto my toast. Just need Mr Maker to finish making the bread...