Showing posts with label home. Show all posts

Friday, January 31, 2014

DIY kitchen makeover part 2

As I mentioned in Part 1 painting the existing cabinets was the way to go for us. I hummed and ahhed for a while about painting (white) vs. staining them dark. I opted to go light as the kitchen area is quite compact and so can be a little dark.   


Finished kitchen
Now before I get into the nuts and bolts of the job let me just tell you, it wasn't that bad. Yup, you read me right, painting the kitchen cabinets wasn't as painful as I had anticipated. I broke it down into jobs I could do in a couple hours either in the mornings whilst the girls were at school or in the evenings.  Having said that painting the cabinets was only really a half of the job of renovating the kitchen. As with every job the list of snags is endless.

Here is a list of the jobs, each of which took between 1-3 hours. I tried to do something everyday, however small, just to keep momentum going.  I think it was about a month from start to finish.

1.  Remove existing hardware and take off cabinet doors.  Label the doors so you know what goes where.


2.  Empty out cupboards. Pack away all non essential items (you're not gonna be baking cakes over the next few weeks)

3.  Clean cabinets. The nice guys at BM recommend good old TSP solution.

4.  Clean doors & draws


Before cleaning


Scrape out crud whilst cleaning
5.  Fill any holes with wood filler. Caulk any joints (e.g. between top of cupboards and ceiling)

6.  Sand cupboards with medium grit (180) sand paper.


7.  Sand cupboard doors.

8.  Wipe doors with tack cloth. Apply one coat of primer (I used Benjamin Moore Fresh Start Primer). Always paint the back of the doors first just in case they mark when you turn them over.

Use a brush over any indents/grooves then a foam roller


Don't forget to prime & paint the sides.  I bought a load of these painters pyramid's to rest the doors on. Well worth the money.

After one coat of primer
9.  Wipe cupboards with tack cloth. Apply one coat of primer.
  • NB: the guy at BM said I only needed one coat of primer & one of the Advance (satin finish) paint. In retrospect I would do 2 coats of primer to get a better coverage.
10.  Lightly sand doors (fine grit, 220 paper) & wipe with a tack cloth.  Apply first coat of paint.

11.  Lightly sand cupboards (fine grit, 220 paper) & wipe with a tack cloth.  Apply first coat of paint.

12.  Wait at least 24 hours before applying second coat to doors & cupboards.  The finish was pretty good after one coat. Where I had used the brush was ever so noticeable which is why I did further coats. 

13.  I did a third coat on the doors for good luck & because I had enough left.

14.  Leave well alone for at least 3 days; the longer the better for your paint to 'cure'.

15.  Attach doors to frames, much easier and quicker if there are two of you.

16.  Attach handles.  I made myself a template for the drill holes from card stock to save myself measuring each one. It really saved time, and stress!


The bar handles were from Glidrite via Ebay. They are solid stainless steel and half the price of the exact same handle from big box stores.  Again I shopped around online for the hinges and found the best deal at Build.com.  It really is worth a little bit of time to shop around online; I saved over 100 bucks on the handles and hinges.

17.  After a week stock up the cupboards.

18.  Stand back and admire your work!


Love my tumble weed!

Other changes
  • Replaced the glass slider which leads out to the garden.  Luckily we have great handy friends who helped us; that is one heavy door!  
  • Several months ago we ripped down the central bank of cupboards above the island. Wow, what a difference that made. Light now streams into the kitchen and you can actually see from one end of the room to the other without having to bend down.
  • A ceiling mounted extractor hood is now in place. I choose this one by because of price and size.  As with all DIY projects its never straight forward; Mr. had to cut the central column of the hood to get the height right (the ceiling is lower in the kitchen). Any excuse to get out the power tools.......


  • Will put in the same LED recessed spot lights as we used in the dining area. Unfortunately the 'well' in the ceiling is structural (why??); to remove it would have required ripping out the ceiling and replacing all the rafters.  We copied our friends 2 doors down who have the same feature and highlighted it with a hidden rope light. It gives off an ambient light and does make the ceiling seem a little higher.
  • Open shelving replaces the cupboard next to the sink. We used Ekby Jarpen/Bjarnum from Ikea as they can be cut to the desired length and the brackets fitted neatly into the notch in the granite left from by the cupboard :)


I'm very proud of my succulents grown from cuttings!
  • Added pull out inserts to the pantry cupboard.  

2 deep draws and 2 wire baskets. Both from Ikea. Contrary to popular believe you can get Ikea inserts to fit regular cabinets!  This is now home to all our dry goods; the pull outs mean you use every inch of space.

The all important before and after...


Before
After
So there you have it. Large exhale of breath, the kitchen is done!


Tuesday, January 21, 2014

DIY kitchen makeover part 1 - Billy becomes built ins


Redoing a kitchen can be a pricey affair.  After doing rough costings for completely replacing cabinets, changing door fronts verses painting with a few new inserts it was a no brainer to go for the painting option.  Even with an Ikea kitchen as the replacement it was considerably more expensive.  Our cabinets were a non offensive style with not too much chintz about them and the doors were in reasonably good shape, good enough to take paint.


The counter tops had been replaced by the previous owners so they didn't need changing. Although the granite would not be my choice its practical and still desirable in our area (gotta think about that resale value!).  

We switch the function of the rooms when we moved in; the previous owners had the space adjacent to the kitchen as a TV/family room and then the dining area through and arch way in the kitchen which was effectively part of the sitting room. We now have a large eat in kitchen/dining area and a TV room off the more formal sitting room. For us it seemed logical as we spend most of our time in the kitchen area.

Saturday morning craft activities
It made sense to tackle the dining end of the room first; the built ins along the end wall could store kitchen items whilst I painted the kitchen cabinets.  There are 4 Billy bookshelves with plain flat trim in between. 


Spacing out the cabinets

I choose the slightly deeper 15" cabinets as its a long room. We decided on 4 as that was the best fit for the space.  The tricky bit was attaching trim to the top and making it appear seamless with the doors which we wanted at either end.

Door on left with replica trim on center cabinet

Trim surrounding cabinets
After caulking, filling and painting the joins are now seamless(ish).  I did an extensive online search to determine the best paint to match Ikea white, apparently its Valspar Dove White.  Its pretty good, not exact. If you want an exact match I would recommend taking a shelf into HD or Lowes and getting them to color match it.  NB. the trim we used came already primed, winner!

We are so pleased with the end result. They are Tardis like in the amount they can store. So much so I need to get thrifting to fill a few empty gaps.


The handy husband installed recessed spot lights and a new fan, we opted for the same one as we have in the bedroom from Minka Aire.

Finished trim


If you are considering adding a 'Billy built in' I would strongly recommend getting the doors. We opted for the full length doors with glass inserts (link here).  You can hide even more junk behind them; one side we have the router and all those nasty cables hidden & the other the girls craft/coloring supplies.


It is a night and day transformation. It is now a light, bright and modern functional space.  What a relief to get rid of that hideous yellow! So here is the before and after. You can just see we also squared off the arch into the hallway.

Before

After
 Yes you can spy tools still lying about!  There are always snags to complete (trim around new sliding door).

If you want details on how to convert the bookshelves or any other info get in touch.  

Part 2 of the kitchen makeover to follow soon...


Monday, August 19, 2013

DIY outdoor chalk board for kids

Sidewalk chalking is a big thing here in the USA, more so than in the UK, and my girls love it as much as the next.  I'm happy for them to scrawl all over pavements in the park but not so happy to step out of our back door and see their 'art'. I put it down to the neat freak in me and the lack of rain here which means you are stuck with said 'art' for weeks (unless of course you bother to hose it off!).

I decided to make a chalk board for the girls to scrawl/doodle/draw on until their hearts are content with the added bonus of covering up our dilapidated fence.

Darn easy project if you've got a fence to hide and/or artistic children:-)

Materials:
  1. Sheet of regular plywood - ours is a massive 8ft x 4ft which is the width between fence posts so easier to secure.  HD or Lowes will cut to size for you. 
  2. Chalk board paint.  I got mind from Lowes and just under $10 for the tin (I used all of it for our board).
  3. Primer. I used some I had left over which was actually white.
  4. Screws to attach to fence. We added a baton of 2x4 across the top for added strength as its so wide.
  5. Bucket of chalk
One coat of primer, 3 coats of chalkboard paint, one evening of taking the fence apart then rebuilding (not my idea!) and we have a chalkboard.


Beautiful bucket of chalk. Looked like this for about 1 day...
Fortunately we've had a few cooler weeks (low 30's) so they have been able to use it.  I think I'll invest in a sail shade to rig up so they can use it more in the summer.  Although when its too cool for the pool it will be a welcome garden activity.

Are your kids chalk fans? Get making a board!

Tuesday, July 2, 2013

Thrifty & Craiglisty finds

I had the good fortune to find myself at the Long Beach Antique Market this Sunday, and what a Flea Market it is! Predictably massive & jam packed full of flea like treasures. In my opinion it is better than the Rose Bowl Flea Market; not quite some many staged stalls & more you can have a good rummage through.

Only coming away with 3 items and my pocket a mere 35 dollars lighter ensures a visit again very soon (weather permitting).


This little guy fixed his steely glare on me & I couldn't leave him behind.


My next acquisition was a set of pool balls for the princely sum of $15. I'm dead chuffed with these as I've been on the look out for ages.   I saw many at the Rose Bowl for $6 a ball, tusk.  Just need to get a glass jar big enough to display my shiny coloured balls...


The final item purchased was this; I'm not 100% sure what it is but AstroRay one side & turquoise target spaceship the other - whats not to love?! It has been added to my plate collection on the kitchen wall.

With leftover cash burning a hole in my purse I called Ed, a Craigslister who had a number of items I was watching. I arranged to meet him at a local lock up. Lock up, mid afternoon, dubious sounding slightly out of it unknown guy...I felt a teensy bit uneasy. Quick text to Mr with the address just in case we weren't home when he got back that evening... Rest assured Ed was a good guy, just not very many teeth (3 I think) but whoaa what a lock up! It was crammed with goodies. Mainly of the old tool variety which is what I had gone for.  I wish I could have spent the afternoon there....
 
   
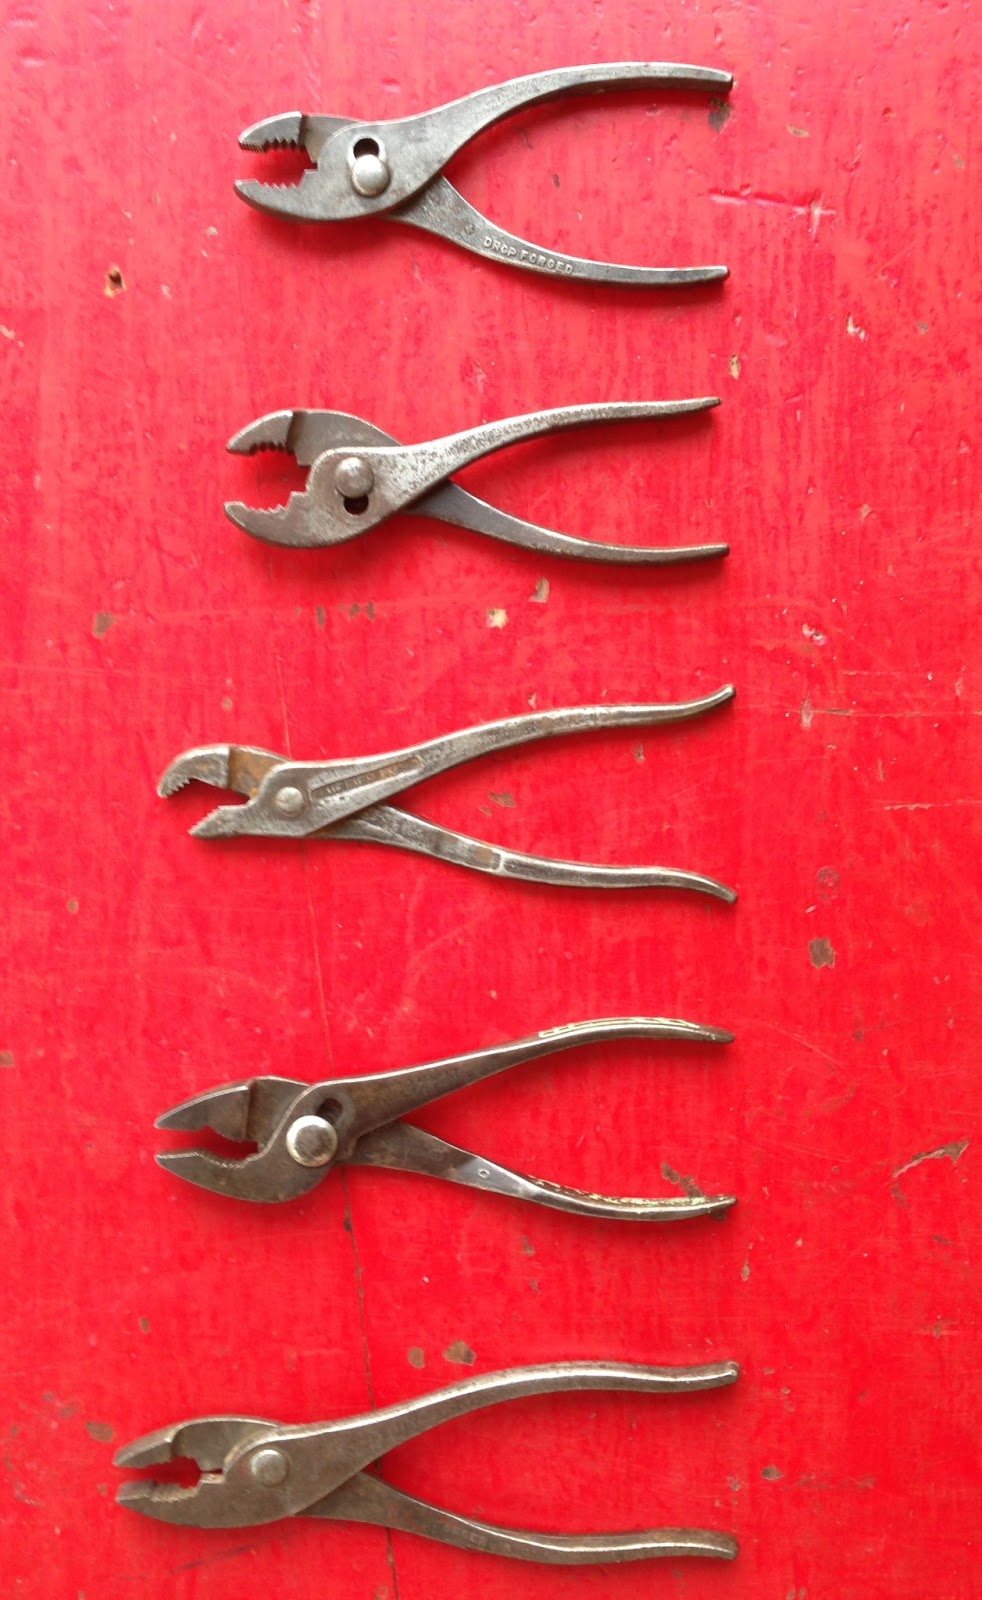
Aren't these pliers great? (OK just me then).  I think they look kind of prehistoric & the middle one is definitely a relation of the steely eyed parrot.  I plan to hang them on the wall in our new TV room. No idea quite how yet...


Just look at the markings on that one!!! OK - I am sounding weird now (Ed thought I was some tool aficionado! ha!)


 A battered red chest which I hope will be home to our board games etc. when I can find the right place for it.


Any idea what these are? Clue - back on the tool theme...Yup vintage tape measures. Now, I really do love these. My poor quality photo doesn't do them justice.  Behind them is my final purchase from out of the lock up - a percussion drum box thing.  Sounds & looks lovely. I couldn't resist.

Purse another $35 lighter and me incomparably happier. 
 

Here they are in their new home.

What do you have collections of? Some else got any old tools?!