Wednesday, September 24, 2014

Spiced Apple bars

It is officially Fall.  Bulbous pumpkins are taking over the fresh produce at the supermarkets and stores are in full on Halloween mode.  It all seems slightly irrelevant as its 37oC outside, we are still swimming in the pool and slurping ice pops!    However not one to miss a baking opportunity Connie & I decided to make these Spiced apple bars which have a definite autumnal ring to them. 


In the UK they are known as flapjacks and were a favourite in my house growing up, with or without the apple.  They are fun for kids to do and worth the fight over the bowl licking rights!

The recipe is slightly adapted from her cookbook "Children's book of Baking".

Spiced Apple bars

2 large or 3 small apples (any variety will do)
6oz unsalted butter
1/2 cup soft brown sugar
2 tablespoons of maple syrup
1 tsp cinnamon
1 tsp ginger
1/4 cup sultanas or raisins
2 tbs sunflower seeds
1/2 cup oats
1/2 cup jumbo oats

Line or grease a 7 x 11 inch tin. Preheat the oven to 325F.

In a medium sized saucepan melt 1oz of the butter. Peel and chop the apples into chunks and add to the melted butter.  Cook them over a low heat until the apples soften slightly, 5 - 10 minutes.  

Add the rest of the ingredients except the oats and seeds.  Stir until the remaining butter and sugar has melted then remove from the heat. Stir in the oats & seeds.  Tip the mixture into the tin then smooth down the top with the back of a spoon.


Bake in the oven for 30 minutes until dark golden and still soft.  Allow to cool in the tin then transfer to a cooling rack and cut into bars or squares.  Be careful not over cook them as they become dry and brittle.


Might of eaten the corner bars....
The house is filled with a delicious aroma which is reminiscent of Autumn, even if its nothing like it outside!


Friday, August 22, 2014

Leather and cork coasters

In my previous life (living in UK) I didn't have coasters, I would have balked at the idea of even owning one.  Possibly due to the 'granny' image or the fact my sitting room was so small we didn't have a coffee table, and therefore no need for a coaster.

Another country and a new perspective; coasters are in my good books.  

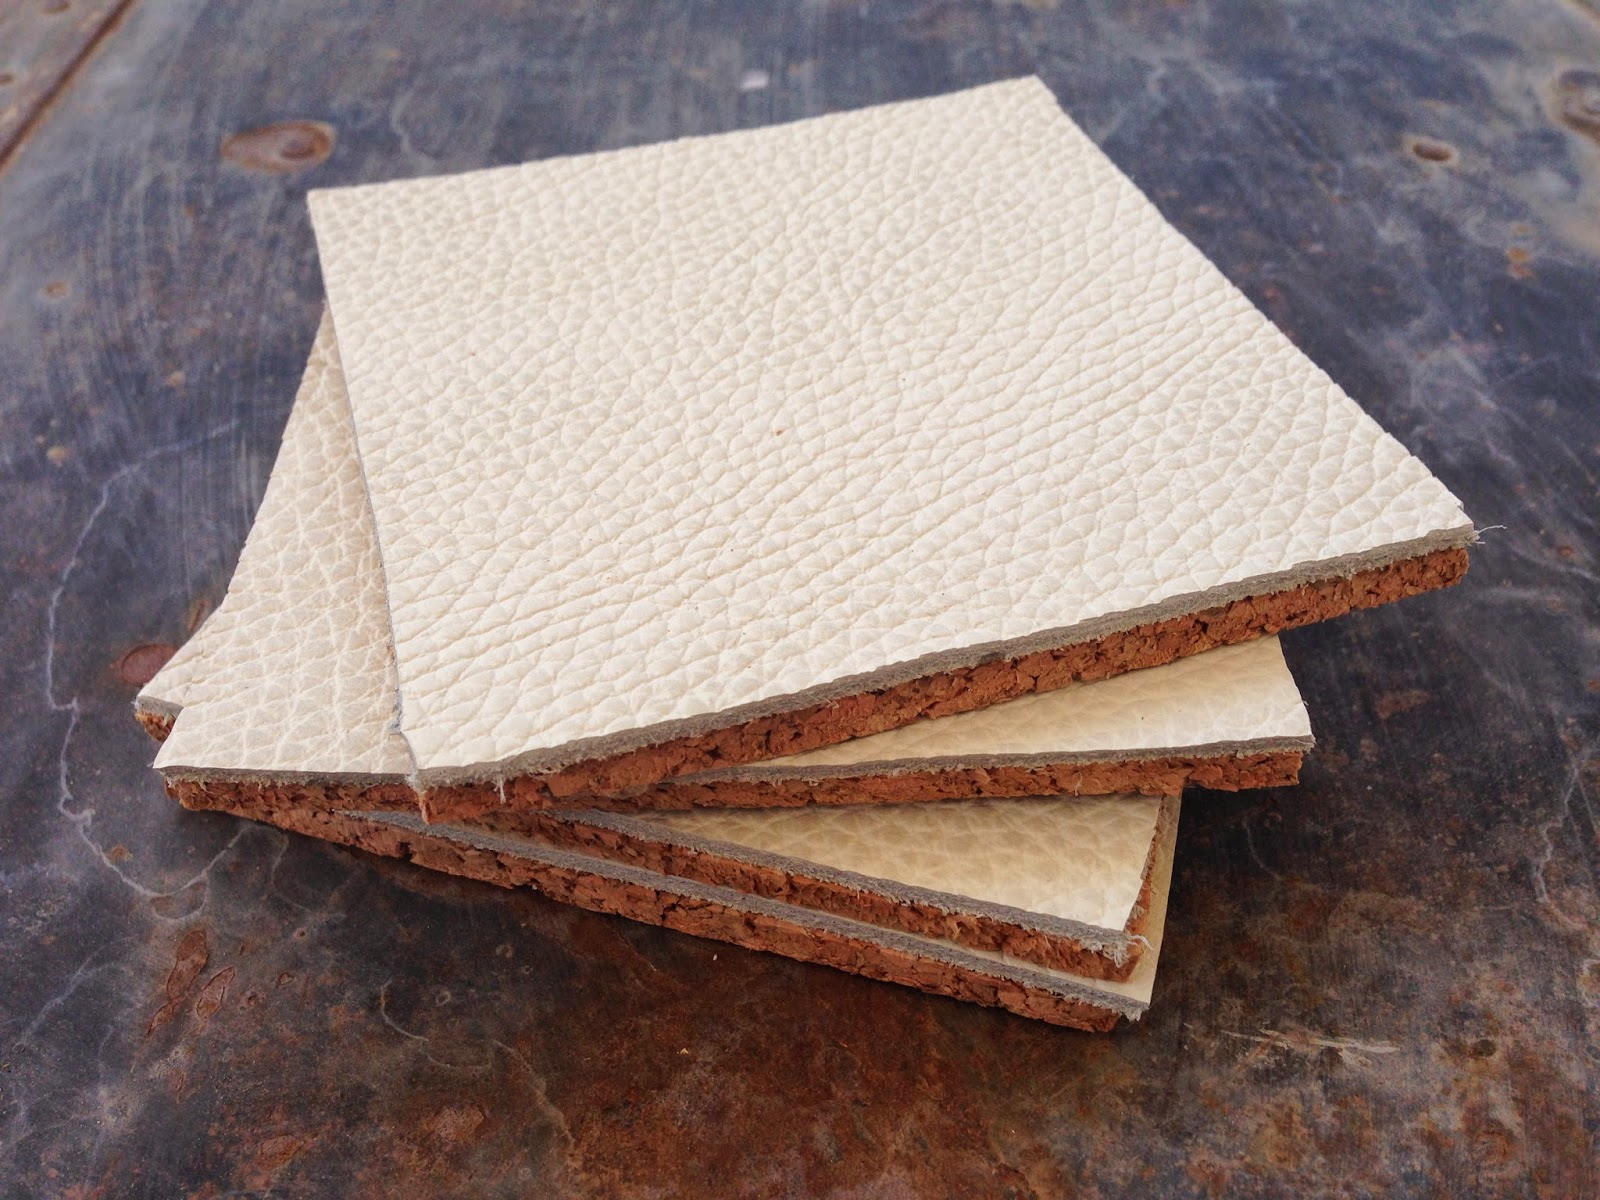
Esme & I made these ones a while ago.  One got eaten (seriously) by a friends little boy and one recently got ripped. Cork is great for coasters but these weren't quite durable enough.

Using leather leftover from having a pair of chairs recovered I've made a new batch. More durable and rather more sexy don't you think?!


First up cut out squares of cork and leather (you can get scrap bags of leather from craft stores which would be perfect for this) using an X-acto knife . Mine are 4" x 4".


Glue the cork and leather squares together using a good quality glue.  Don't worry if the squares don't 100% match up, you can trim them up when the glue has dried.


Using masking tape mark out your pattern. I went for geometric, my current love is anything geometric...


A great little craft project which takes no time (hour or so) and uses readily available supplies.  

Any suggestions what to do with the rest of the leftover leather?

Thursday, July 31, 2014

Gluten free banana bread

Its 8.15pm and I'm hungry. We have cupboards full of food but nothing to eat, you know the scene?!  I have had this banana bread on my mind since we returned from our summer holiday and was planning on making it with the girls.  I can't wait. I've made it. It is so quick and easy, requiring ingredients you have to hand (who doesn't have zillions of brown bananas in their freezer?) and only one bowl to wash up. Yay!


Gluten Free Banana Bread
adapted from this recipe

3 large ripe bananas
1 egg
3 tbs coconut oil
3/4 cup milk (dairy or non dairy)
1 tsp vanilla extract
1/3 cup brown sugar
3 tsp baking soda
1 cup almond meal
1 cup cashew nut meal
1 cup gluten free flour (I used brown rice flour)
1 cup of jumbo oats 
1 tsp ground cinnamon
pinch of salt
3/4 sultanas

Preheat the oven to 365F.  Grease and line a loaf tin.  Mash the bananas then add the wet ingredients.  Mix thoroughly.  Add the dry ingredients to the wet and mix until combined. Lastly stir in the sultanas.  Pop in the oven and bake for approximately one hour, until golden on top and a skewer comes out clean.

Cut yourself a generous wedge, top with butter if you desire (I do) and even jam if you are feeling decadent. I keep mine in the fridge in an air tight container and it will last about a week. Its also delicious toasted.


Go make it, whatever time of day it is. 


Monday, July 14, 2014

No churn Rocky Road Ice cream

The summer heat has arrived in Redlands; days hover around the mid to high 30s and the nights are fractionally cooler.  So ice cream is definitely on the agenda.  This is a super easy recipe that does not require an ice cream maker or the hassle of having to take it out of the freezer to stir every hour.  It is very rich but grown ups and kids alike gobbled it up at our 4th of July party.


Another bonus of this recipe is it does not require exact measurements, use whatever you have to hand and what takes your fancy!


No churn Rocky Road Ice Cream

1 can of condensed milk
600ml of heavy cream
1 1/2 cups of chocolate chips, melted
Equal amounts of the following:
crushed cookies (I used plain vanilla cookies)
dried cranberries (or sultanas)
mini marshmallows
semi sweet chocolate chips
chopped nuts of your choice (optional)

Using an electric whisk mix together the cream and condensed milk until thick. 
'Ribbon' thickness
Stir in the melted chocolate until fully incorporated.  Finally stir in the Rocky Road ingredients.  Transfer to a Tupperware with a tight fitting lid and freeze overnight.  Be warned it makes a lot!


Enjoy x

Thursday, April 3, 2014

Craigslist Credenza

I'm a fitful Craigslist user. Some weeks I am scouring everyday in the hope of hitting the jackpot (you know when you find that item) other weeks I can take it or leave it. Thus allowing myself the illusion I'm not a compulsive bargain hunter.

This particular purchase was found on a random flick through day. Everyone needs a credenza, right?


Here is the original image from Craigslist.


Not the best picture, but a bad Craigslist pic is a good thing.  It can often disguise a hidden gem that only you, with your trained eye can spot.  Also it can mean less interest (those without your superior 'eye' pass it up) = plenty of wiggle room on the price.  It was the chrome legs that sucked me in...

I wanted to paint it mint green. The best colour match was a Valspar spray paint called Mellow Spring. I love the colour but won't be using Valspar spray paints again. 5 cans later its still not the best finish but I feel guilty enough about the environmental impact of those 5 cans, not to mention the light dusting of Mellow Spring on everything in the garage.

To cover the laminate top I ordered PSA walnut veneer and edge banding to fit around the sides. It was worth a shop around on the veneer as the same product seems to vary greatly in price.

Having lightly sanded the cabinet all over I covered the chrome base and loosely cover the top. I applied one coat of primer to the cabinet then went all out with the 5 cans of spray paint.

The next stage was the application of wood veneer.  As there was wood involved Mr. got in the mix (I think woodworking is considered more manly than regular re purposing).  After much deliberation with decided to do the edge banding first. 

Ironing on edge banding
Using a Stanley knife we trimmed it down to be level with the top.

Smoothing down veneer with homemade scraper
Sticking down the top piece of veneer was a little more tense. Its pretty sticky stuff so there is no margin for error. Having cut a piece bigger than needed, we started by lowering the middle down then applied pressure outwards, smoothing as we went.  Mr. fashioned a veneer scraper from a scrap of wood which he used to smooth out any air bubbles. Fortunately there were just as many air bubbles on his side as mine! They did all come out.  I then did the final trim around the top.  We were both very impressed with the results. The edges are extremely neat and it could pass as a solid piece of wood.

Several coats of beeswax and orange oil furniture polish (the best BTW) and we were good to go.


Just look at those edges and corner!

Beautiful wood


Break down of costs

Credenza $60 (advertised as $100)
Walnut edge banding (plenty leftover) $22
Walnut veneer (inc shipping) not all used $60
Spray paint $25

Total cost for one-of-a-kind credenza = $150

Not the cheapest piece but I can see it being of use to us for many years to come. 

Alice xx


Tuesday, April 1, 2014

Chocolate covered coconut squares

Chocolate and coconut is a winning combination.  This is a great little recipe and a fun one to do with kids as its quick, it can all be done by hand and you get 2 delicious bowls to lick!  There are plenty of recipes out there for similar chocolate/coconut bites. I looked at a few a came up with my own quantities.


Chocolate covered coconut squares

2 cups of unsweetened coconut flakes
1/4 cup of coconut oil warmed
1/4 cup of honey
generous dash of vanilla extract
pinch of sea salt
4 oz 72% dark chocolate
knob of butter


Mix together all of the ingredients together except the chocolate & butter.  You can blitz it a little in a food processor which makes it a smoother texture or just do by hand.  Press the coconut mixture into a tin or Tupperware greased with coconut oil or lined with parchment paper.  I used an 8"x 8" tin which was just too big. My coconut layer is not quite thick enough.  Pop it into the freezer for 15 minutes while you melt the chocolate and butter.

Once the coconut layer has firmed up pour over the melted chocolate.  Tap the tin to get any air bubbles out. I sprinkled over some Roasted coconut chips from Trader Joe's then put back in the fridge/freezer to set. 

Cut into squares when set. To make you feel better I ate 5 in the first sitting...Be warned they are very moreish!


NB: To make a 100% paleo version you need chocolate without added sugar. I used 72% dark which has a little sugar in. I'm OK with that, its your choice.  

Monday, March 24, 2014

Which Rug?

We are on the home straight in terms of our house renovations - whoop whoop!!! We are about to pull the trigger on the engineered hardwood floors and once we've laid those we are finished, well on the inside of the house anyway. The garden is another story.

I decorated the front sitting room about a month ago (post to come) and since then I have spent a disproportional about of time debating what type of rug to get. I think it may have something to do with the fact I don't work or get out much.....

Of course I would love to have one from my very talented cousin Lucy Wassell but sadly she is way out of my price range (she designs rugs which are hand tufted in the UK). 

I have narrowed my choices down to a few options.
  1. Ikea Stockholm rug A bargain at $299 for a massive 8'x11' rug.

minimal-entertainment-system
Source: Emily Henderson

2. Rugs USA Homespun Medea Chevron Rug Currently on sale at $309. 
Not sure I am 100% sold on the black/white/chevron theme. A little passe non? 


Source: RugsUSA

3. Vintage Kilim Rug This is a beautiful rug made in a traditional style from goat hair no less! Also a very good price at $259 for a large rug. Would it make my house smell of goats?!
 
Source: Ebay

4. Anatolian Turkish Classic Antalya Kilim Rug. Another ebay find. I think this is my favourite, typical as its the most expensive at $599! Although this type of kilim rug is a bit 'trendy' at the moment so that gives me slight reservations. 

Source: Ebay

So what do you think? I would love some thoughts. I am determined to make a decision, soon.

BTW NO ONE is allowed to go and buy 'my' rugs from Ebay ;)  

Alice x